
こんにちは。Tomoyuki(@tomoyuki65)です。
データベースには様々な種類がありますが、検索エンジンとして利用したり、ログ分析を行うような場面で利用されるものとして、『OpenSearch(Elasticsearch)』があります。
ということでこの記事では、Go言語(Golang)でOpenSearch(Elasticsearch)の使い方についてまとめます。
Go言語(Golang)でOpenSearch(Elasticsearch)の使い方|Docker環境構築+サンプルAPI
OpenSearch(Elasticsearch)とは?
OpenSearch(オープンサーチ)は、大量のデータを高速に検索・分析できるオープンソースの検索エンジンです。
主にWebサービスにおける全文検索機能や、ログデータの分析によるシステム監視・運用などに活用されます。
例えば全文検索については、大量のデータの中からキーワードに一致する情報を瞬時に見つけ出すことができます。
また、分散型のアーキテクチャを採用しているため、データ量が増えても複数のサーバーに処理を分散し、安定したパフォーマンスを維持できます。
そんなOpenSearchは、もともとElasticsearch およびその可視化ツールであるKibanaをベースにしたプロジェクトから派生したフォークです。
そのため、検索エンジンとしての基本的な性能や使いやすさを受け継ぎつつ、オープンな形で開発が続けられているのが特徴です。
OpenSearch(Elasticsearch)の主な用途
・サーバーやアプリのログ収集・分析
・システムの監視・障害検知(エラー検出、遅延監視など)
・セキュリティログを使った不正アクセス検知・監視(SIEM用途)
・ユーザー行動データの分析によるサービス改善・プロダクト分析
・ダッシュボードを使ったデータの可視化(KPI・運用状況の把握)
・大規模データのリアルタイム分析基盤
DockerでOpenSearchのコンテナを立てる方法
ではDockerを使い、ローカル開発環境としてRedisのコンテナを立ててみます。
まずは以下のコマンドを実行し、ファイルを作成します。
$ mkdir go-opensearch && cd go-opensearch
$ touch compose.yml
次に作成したファイルを以下のように記述します。
・「compose.yml」
services:
  # OpenSearchのドキュメントページからDockerfileの内容をコピー
  # https://docs.opensearch.org/latest/install-and-configure/install-opensearch/docker/#sample-docker-compose-file-for-development
  opensearch-node1:
    image: opensearchproject/opensearch:latest
    container_name: opensearch-node1
    environment:
      - cluster.name=opensearch-cluster # Name the cluster
      - node.name=opensearch-node1 # Name the node that will run in this container
      - discovery.seed_hosts=opensearch-node1,opensearch-node2 # Nodes to look for when discovering the cluster
      - cluster.initial_cluster_manager_nodes=opensearch-node1,opensearch-node2 # Nodes eligibile to serve as cluster manager
      - bootstrap.memory_lock=true # Disable JVM heap memory swapping
      - "OPENSEARCH_JAVA_OPTS=-Xms512m -Xmx512m" # Set min and max JVM heap sizes to at least 50% of system RAM
      - "DISABLE_INSTALL_DEMO_CONFIG=true" # Prevents execution of bundled demo script which installs demo certificates and security configurations to OpenSearch
      - "DISABLE_SECURITY_PLUGIN=true" # Disables Security plugin
    ulimits:
      memlock:
        soft: -1 # Set memlock to unlimited (no soft or hard limit)
        hard: -1
    nofile:
      soft: 65536 # Maximum number of open files for the opensearch user - set to at least 65536
      hard: 65536
    volumes:
      - opensearch-data1:/usr/share/opensearch/data # Creates volume called opensearch-data1 and mounts it to the container
    ports:
      - 9200:9200 # REST API
      - 9600:9600 # Performance Analyzer
    networks:
      - opensearch-net # All of the containers will join the same Docker bridge network
  opensearch-node2:
    image: opensearchproject/opensearch:latest
    container_name: opensearch-node2
    environment:
      - cluster.name=opensearch-cluster # Name the cluster
      - node.name=opensearch-node2 # Name the node that will run in this container
      - discovery.seed_hosts=opensearch-node1,opensearch-node2 # Nodes to look for when discovering the cluster
      - cluster.initial_cluster_manager_nodes=opensearch-node1,opensearch-node2 # Nodes eligibile to serve as cluster manager
      - bootstrap.memory_lock=true # Disable JVM heap memory swapping
      - "OPENSEARCH_JAVA_OPTS=-Xms512m -Xmx512m" # Set min and max JVM heap sizes to at least 50% of system RAM
      - "DISABLE_INSTALL_DEMO_CONFIG=true" # Prevents execution of bundled demo script which installs demo certificates and security configurations to OpenSearch
      - "DISABLE_SECURITY_PLUGIN=true" # Disables Security plugin
    ulimits:
      memlock:
        soft: -1 # Set memlock to unlimited (no soft or hard limit)
        hard: -1
      nofile:
        soft: 65536 # Maximum number of open files for the opensearch user - set to at least 65536
        hard: 65536
    volumes:
      - opensearch-data2:/usr/share/opensearch/data # Creates volume called opensearch-data2 and mounts it to the container
    networks:
      - opensearch-net # All of the containers will join the same Docker bridge network
  opensearch-dashboards:
    image: opensearchproject/opensearch-dashboards:latest
    container_name: opensearch-dashboards
    ports:
      - 5601:5601 # Map host port 5601 to container port 5601
    expose:
      - "5601" # Expose port 5601 for web access to OpenSearch Dashboards
    environment:
      - 'OPENSEARCH_HOSTS=["http://opensearch-node1:9200","http://opensearch-node2:9200"]'
      - "DISABLE_SECURITY_DASHBOARDS_PLUGIN=true" # disables security dashboards plugin in OpenSearch Dashboards
    networks:
      - open search-net
volumes:
  opensearch-data1:
  opensearch-data2:
networks:
opensearch-net:※DockerコンテナのサンプルコードはOpenSearchのドキュメントページに載っているのでそれを利用します。
次に以下のコマンドを実行し、Dockerコンテナの起動を行います。
$ docker compose up -d
次に以下のコマンドを実行し、Dockerコンテナの起動を確認します。
$ docker compose ps
コマンド実行後、以下のように3つのコンテナが起動していればOKです。

OpenSearchの使い方
curlコマンドでDB操作を試す
OpenSearchのDockerコンテナを起動後、URL「http://localhost:9200」とcurlコマンドを使ってDB操作が可能です。
今回は商品データを登録して検索するようなものを例として試してみます。
curlコマンドでインデックス作成
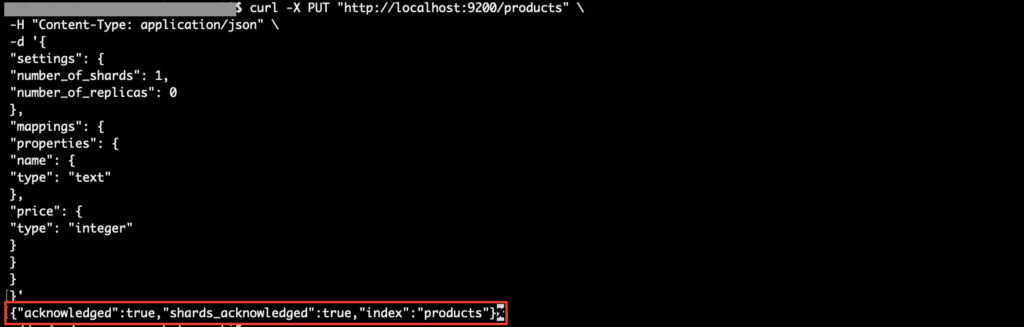
まずはデータを登録するためのインデックス(index)を作りますが、データ構造を定義するためのマッピング(mapping)も付けて作ります。
ではインデックス名は「products」とし、以下のコマンドを実行してマッピング付きのインデックスを作成します。
curl -X PUT "http://localhost:9200/products" \
-H "Content-Type: application/json" \
-d '{
  "settings": {
    "number_of_shards": 1,
    "number_of_replicas": 0
  },
  "mappings": {
    "properties": {
      "name": {
        "type": "text"
      },
      "price": {
        "type": "integer"
      }
    }
  }
}'
※settingsでシャード(データ分散設定)やレプリカ(シャードのコピー設定)の設定をしていますが、例えば本番環境などでは適切な値を設定することになります。
コマンド実行後、レスポンス結果に「”acknowledged”:true」があれば正常終了です。
curlコマンドでデータ登録
次に以下のコマンドをそれぞれ実行し、商品データを登録します。
・商品データ1(ID「xxxx-xxxx-0001」)を登録
curl -X POST "http://localhost:9200/products/_doc/xxxx-xxxx-0001" \
-H "Content-Type: application/json" \
-d '{
  "name": "apple",
  "price": 200
}'
※URLの「_doc/xxxx-xxxx-0001」の部分でIDを指定してますが、「_doc」だけにすると自動でIDが付与されます。
・商品データ2(ID「xxxx-xxxx-0002」)と商品データ3(ID「xxxx-xxxx-0003」)を一括登録
curl -X POST "http://localhost:9200/products/_bulk" \
-H "Content-Type: application/x-ndjson" \
--data-binary '
  { "index": { "_id": "xxxx-xxxx-0002" } }
  { "name": "りんごジュース", "price": 300 }
  { "index": { "_id": "xxxx-xxxx-0003" } }
  { "name": "野菜ジュース", "price": 400 }
'
コマンド実行後、それぞれのレスポンス結果に「”result”:”created”」があればOKです。
・商品データ1の結果

・商品データ2と商品データ3の結果

curlコマンドでデータ検索
次に以下のコマンドを実行し、登録した全てのデータを取得してみます。
curl -X GET "http://localhost:9200/products/_search" \
-H "Content-Type: application/json" \
-d '{
  "query": {
    "match_all": {}
  }
}'
コマンド実行後、以下のように登録したデータが全て取得できればOKです。

※取得件数などもわかります。
次にnameに「ジュース」が含まれているデータを検索するため、以下のコマンドを実行します。
curl -X GET "http://localhost:9200/products/_search" \
-H "Content-Type: application/json" \
-d '{
  "query": {
    "match": {
      "name": "ジュース"
    }
  }
}'
コマンド実行後、以下のように対象データを検索できればOKです。

curlコマンドでデータ更新
次に対象データの更新を試すため、以下のコマンドを実行し、ID「xxxx-xxxx-0001」のデータのnameを「りんご」に更新します。
curl -X POST "http://localhost:9200/products/_update/xxxx-xxxx-0001" \
-H "Content-Type: application/json" \
-d '{
  "doc": {
    "name": "りんご"
  }
}'
コマンド実行後、レスポンス結果に「”result”:””updated”」があればOKです。

次に以下のコマンドを実行し、IDから対象データを検索します。
curl -X GET "http://localhost:9200/products/_doc/xxxx-xxxx-0001"
コマンド実行後、以下のように対象データが想定通り更新されていればOKです。
![]()
curlコマンドでデータ削除
次に対象データの削除を試すため、以下のコマンドを実行し、ID「xxxx-xxxx-0003」のデータを削除します。
curl -X DELETE "http://localhost:9200/products/_doc/xxxx-xxxx-0003"
コマンド実行後、レスポンス結果に「”result”:””deleted”」があればOKです。
![]()
次に以下のコマンドを実行し、全てのデータを取得して確認します。
curl -X GET "http://localhost:9200/products/_search" \
-H "Content-Type: application/json" \
-d '{
  "query": {
    "match_all": {}
  }
}'
コマンド実行後、対象データが削除されていればOKです。

curlコマンドでインデックス(データ含む)を削除したい場合
上記で登録したインデックスおよびデータを全て削除したい場合、以下のコマンドを実行すると可能です。
curl -X DELETE "http://localhost:9200/products"
その他の操作について
このようにcurlコマンドを使って各種DB操作が可能です。
他にもデータ検索時に集計なども可能ですが、その他の操作についてはOpenSearchのドキュメントページをご確認下さい。
ファイルからインデックスを登録する方法
上記でインデックスを登録する例では、コマンドで直接登録していますが、インデックスの定義をjsonファイルにし、そのファイルを使って登録することも可能です。
例えば以下のコマンドを実行し、ファイルを作成します。
$ mkdir -p opensearch/local && touch opensearch/local/products.json
$ touch opensearch/create_index.sh
次に作成したファイルを以下のように記述します。
・「opensearch/local/products.json」
{
  "settings": {
    "number_of_shards": 1,
    "number_of_replicas": 0
  },
  "mappings": {
    "properties": {
      "name": {
        "type": "text"
      },
      "price": {
        "type": "integer"
      }
    }
  }
}
・「opensearch/create_index.sh」
#!/bin/bash

ENV=$1

if [ -z "$ENV" ]; then
  echo "Usage: ./create_index.sh [local|prod]"
  exit 1
fi

# 環境ごとの接続先設定
if [ "$ENV" = "local" ]; then
  HOST="http://localhost:9200"
elif [ "$ENV" = "prod" ]; then
  # ※本番環境用のHOSTに修正して下さい。※
  HOST=""
else
  echo "Invalid ENV: $ENV (use local or prod)"
  exit 1
fi

# productsの登録
FILE_1="./opensearch/${ENV}/products.json"

echo "Creating index from: $FILE_1"

curl -X PUT "${HOST}/products" \
-H "Content-Type: application/json" \
--data-binary @"$FILE_1"
※本番環境用として使う場合はHOST設定を修正して下さい。
次に以下のコマンドを実行し、「opensearch/create_index.sh」のパーミッション設定を変更します。
$ chmod +x ./opensearch/create_index.sh
次にインデックスを登録したい場合は、以下のコマンドを実行して可能です。
$ ./opensearch/create_index.sh local※本番環境なら「prod」にして下さい。
OpenSearch Dashboardsの使い方
上記のcompose.ymlではopensearch-dashboardsコンテナも起動するようになっていたため、次にOpenSearch Dashboardsも試してみます。
ブラウザでOpenSearch Dashboardsを開く
まずはブラウザで「http://localhost:5601」にアクセスし、以下のような画面が表示されればOKです。
ポップアップが表示されているので、「Dismiss」をクリックします。

これでOpenSearch Dashboardsを利用できます。
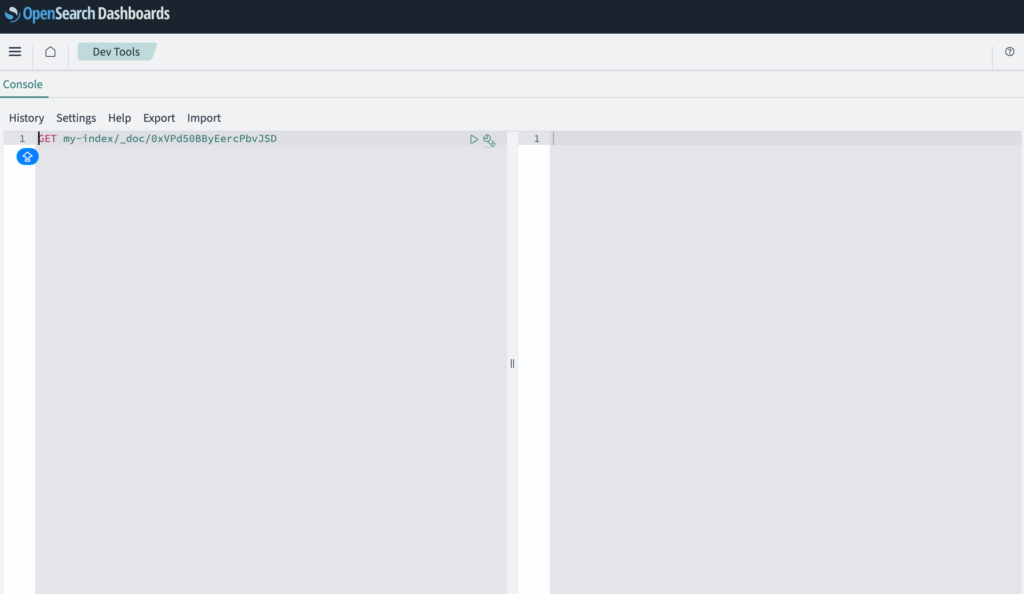
Dev toolsを試す
OpenSearch Dashboardsには分析系の機能が色々ありますが、開発時に使うものとしては「Dev tools」になります。
Dev toolsを使うには、画面右上の「Dev tools」をクリックします。
これでDev tools画面が開きます。
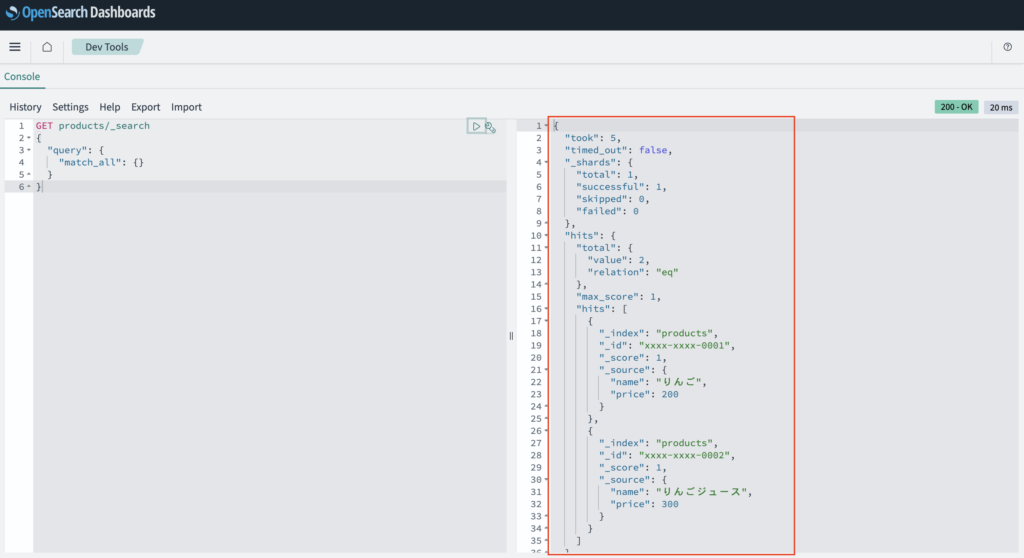
例えば上記で登録したデータを取得してみるため、以下のコマンドを入力し、画面中央にある▷ボタンをクリックします。
GET products/_search
{
  "query": {
    "match_all": {}
  }
}
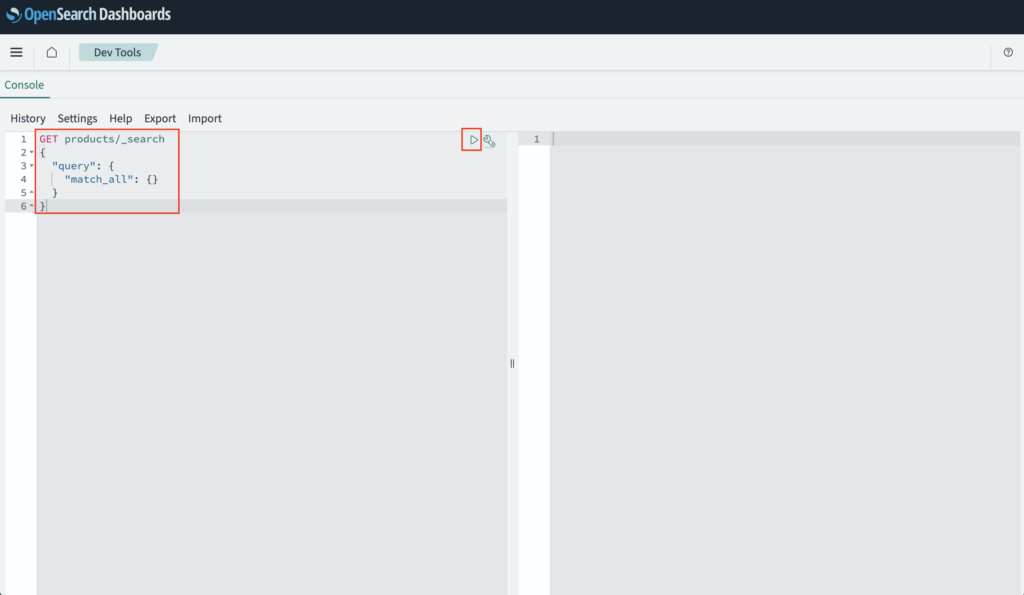
実行後、画面右側に結果が表示されるので、対象データが全て表示されればOKです。
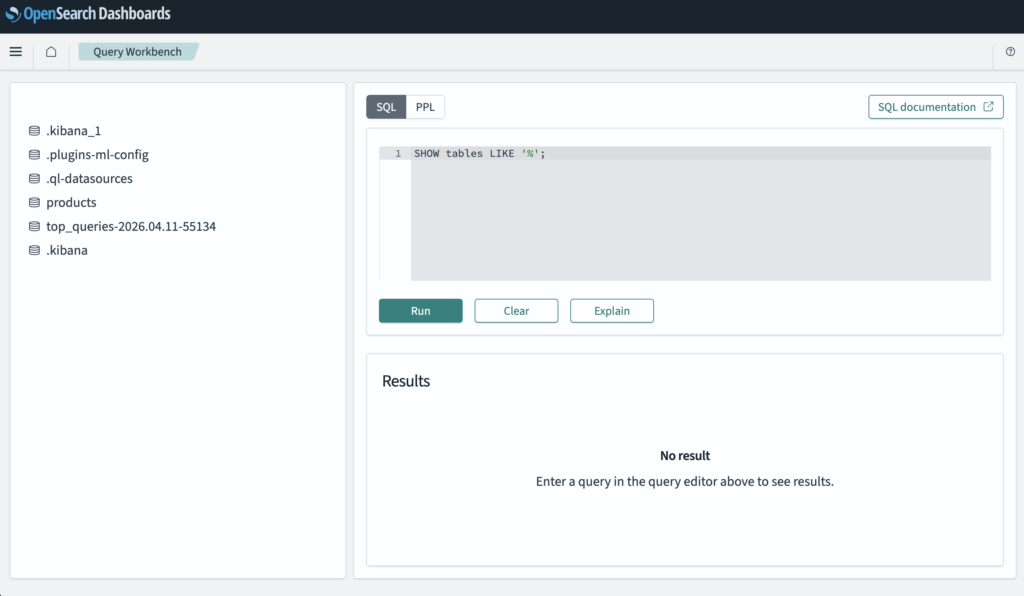
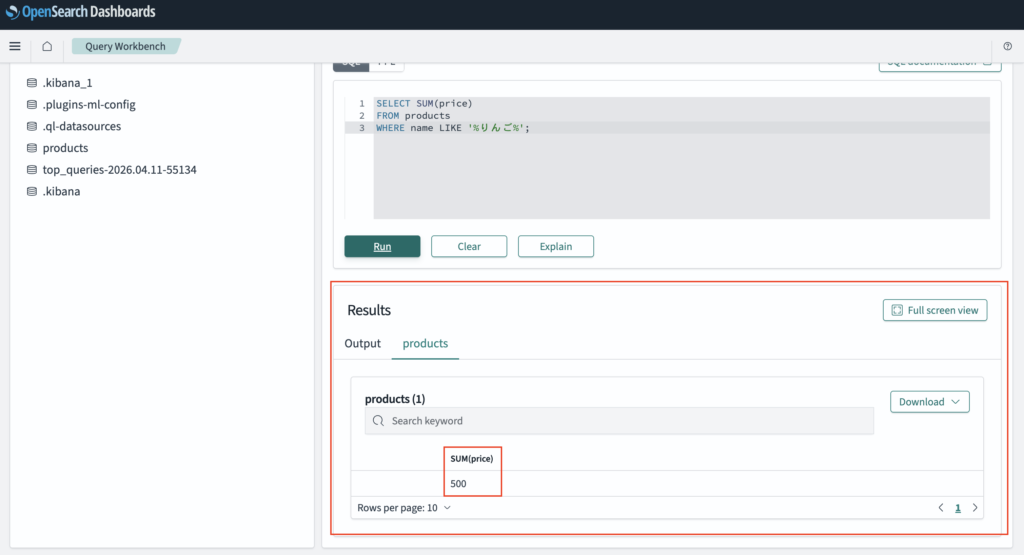
Query Workbenchを試す
また、SQLを使って集計などを試したい場合は、「Query Workbench」機能を使うと可能です。
Query Workbenchを使いたい場合は、画面左のメニューから「OpenSearch Plugins > Query Workbench」をクリックします。

これでQuery Workbench画面が開きます。
例えば上記で登録したデータを用いて、nameに「りんご」が含まれているデータのpriceを集計するSQLを入力し、画面中央にある「Run」をクリックします。
SELECT SUM(price)
FROM products
WHERE name LIKE '%りんご%';
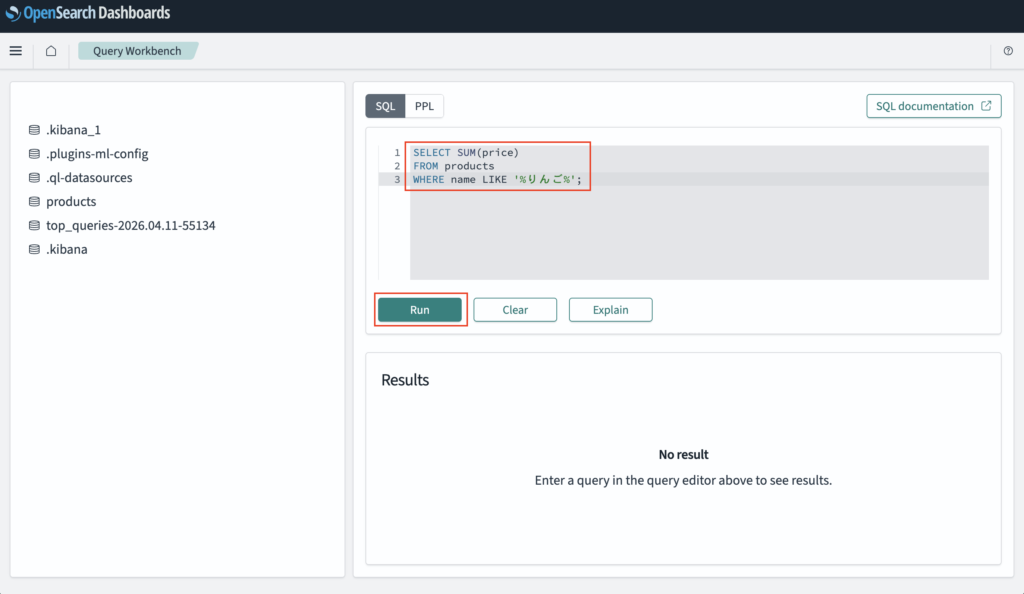
実行後、以下のように対象データのpriceの合計値が取得できればOKです。
日本語検索の精度を変える方法
デフォルト設定だと日本語の検索精度が弱いため、kuromoji(日本語解析)などを導入して検索精度を変えることができます。
kuromojiを導入したい場合は、Dockerコンテナ内にkuromojiのプラグインがインストールされている必要があるため、今回の例では以下のコマンドを実行してインストールおよびDockerコンテナの再起動をします。
$ docker exec -it opensearch-node1 \
bin/opensearch-plugin install analysis-kuromoji

$ docker exec -it opensearch-node2 \
bin/opensearch-plugin install analysis-kuromoji

$ docker restart opensearch-node1
$ docker restart opensearch-node2
次にインデックス定義にanalysis設定などを追加する必要(登録済みのインデックスに追加したい場合、インデックスの再作成が必要になります)があるため、例えば上記で作成したファイル「opensearch/local/products.json」を以下のように修正します。
・「opensearch/local/products.json」
{
  "settings": {
    "analysis": {
      "filter": {
        "ja_synonym": {
          "type": "synonym",
          "synonyms": [
            "りんご,アップル",
            "ジュース,飲み物"
          ]
        }
      },
      "tokenizer": {
        "my_ngram_tokenizer": {
          "type": "ngram",
          "min_gram": 2,
          "max_gram": 3
        }
      },
      "analyzer": {
        "ja_analyzer": {
          "type": "custom",
          "tokenizer": "kuromoji_tokenizer",
          "filter": [
            "kuromoji_baseform",
            "kuromoji_part_of_speech",
            "cjk_width",
            "ja_stop",
            "lowercase",
            "ja_synonym"
          ]
        },
        "ngram_analyzer": {
          "type": "custom",
          "tokenizer": "my_ngram_tokenizer",
          "filter": ["lowercase"]
        }
      }
    },
    "number_of_shards": 1,
    "number_of_replicas": 0
  },
  "mappings": {
    "properties": {
      "name": {
        "type": "text",
        "analyzer": "ja_analyzer",
        "fields": {
          "ngram": {
            "type": "text",
            "analyzer": "ngram_analyzer"
          },
          "keyword": {
            "type": "keyword"
          }
        }
      },
      "price": {
        "type": "integer"
      }
    }
  }
}
※「settings.analysis.filter.ja_synonym」が日本語の同義語(言い換え)を定義するフィルター設定です。「settings.analysis.tokenizer.my_ngram_tokenizer」が部分一致用の条件を定義する設定です。
※「settings.analysis.analyzer.ja_analyzer.filter」のフィルター設定については、kuromoji_baseformは「動詞や形容詞などを基本形(原形)に変換する」、kuromoji_part_of_speechは「助詞・助動詞など検索に不要な品詞を除去する」、cjk_widthは「全角・半角の違いを正規化する」、ja_stopは「『の』『は』などの日本語ストップワードを除去する」、lowercaseは「英字を小文字に統一する」、ja_synonymは「settings.analysis.filter.ja_synonym」の設定です。
※また、mappingsの対象フィールドに対して「analyzer」や「fields」の設定も必要です。尚、fieldsの「keyword」は完全一致検索用です。
次に以下のコマンドを実行し、インデックスを再作成します。
・インデックス「products」の削除
curl -X DELETE "http://localhost:9200/products"
・インデックスの再登録
./opensearch/create_index.sh local
次に以下のコマンドを実行し、検索エンジンの辞書分解テスト機能を試します。
curl -X GET "http://localhost:9200/products/_analyze" \
-H "Content-Type: application/json" \
-d '{
  "analyzer": "ja_analyzer",
  "text": "青りんごジュース"
}'
コマンド実行後、以下のように5種類の単語に分解されていればOKです。

次に以下のコマンドをそれぞれ実行し、データを登録します。
・商品データ1
curl -X POST "http://localhost:9200/products/_doc/xxxx-xxxx-0001" \
-H "Content-Type: application/json" \
-d '{
  "name": "青りんごジュース",
  "price": 200
}'
・商品データ2
curl -X POST "http://localhost:9200/products/_doc/xxxx-xxxx-0002" \
-H "Content-Type: application/json" \
-d '{
  "name": "アップルジュース",
  "price": 300
}'
次に以下のコマンドをそれぞれ実行し、検索結果を確認します。
・name(意味検索 / match)
curl -X GET "http://localhost:9200/products/_search" \
-H "Content-Type: application/json" \
-d '{
  "query": {
    "match": {
      "name": "りんご"
    }
  }
}'
実行後、以下のように2件のデータが取得できればOKです。

・name.ngram(部分一致 / match)
curl -X GET "http://localhost:9200/products/_search" \
-H "Content-Type: application/json" \
-d '{
  "query": {
    "match": {
      "name.ngram": "りん"
    }
  }
}'
実行後、以下のように1件のデータが取得できればOKです。

・name.keyword(完全一致 / term)
curl -X GET "http://localhost:9200/products/_search" \
-H "Content-Type: application/json" \
-d '{
  "query": {
    "term": {
      "name.keyword": "青りんごジュース"
    }
  }
}'
実行後、以下のように1件のデータが取得できればOKです。

Go言語(Golang)でOpenSearchを操作するサンプルAPIを作って試す
Go言語(Golang)でサンプルAPIの準備
次にGoのサンプルAPIを準備します。まずは以下のコマンドを実行し、上記で起動中のDockerコンテナを削除します。
$ docker compose down -v※オプション「-v」でボリュームも削除します。
次に以下のコマンドを実行し、各種ファイルを作成します。
$ mkdir -p docker/local/db && touch docker/local/db/Dockerfile
$ mkdir -p docker/local/go && touch docker/local/go/Dockerfile
$ mkdir src && touch src/main.go
$ touch .env
次に作成したファイルをそれぞれ以下のように記述します。
・「docker/local/db/Dockerfile」
FROM opensearchproject/opensearch:latest

# プラグインインストール
RUN /usr/share/opensearch/bin/opensearch-plugin install analysis-kuromoji
※opensearchコンテナにanalysis-kuromojiをインストールするため、Dockerfile化しています。
・「docker/local/go/Dockerfile」
FROM golang:1.26.1-alpine3.23

WORKDIR /go/src

COPY ./src .

# go.modがあれば依存関係をインストール
RUN if [ -f ./go.mod ]; then \
      go install; \
    fi

# 開発用のライブラリをインストール
RUN go install github.com/air-verse/air@v1.64.5
RUN go install honnef.co/go/tools/cmd/staticcheck@latest

EXPOSE 8080
・「src/main.go」
package main

import (
    "log/slog"
    "net/http"

    "github.com/labstack/echo/v4"
)

func main() {
    // echoのルーター設定
    e := echo.New()

    e.GET("/", func(c echo.Context) error {
        // レスポンス結果の設定
        res := map[string]string{
            "message": "Hello World !!",
        }

        return c.JSON(http.StatusOK, res)
    })

    // ログ出力
    slog.Info("start go-redis")

    // サーバー起動
    e.Logger.Fatal(e.Start(":8080"))
}
・「.env」
ENV=local
OPENSEARCH_URL=http://opensearch-node1:9200
OPENSEARCH_USERNAME=
OPENSEARCH_PASSWORD=
※ローカル開発時のOPENSEARCH_URLのホスト名はcompose.ymlの「opensearch-node1」です。OPENSEARCH_USERNAMEとOPENSEARCH_PASSWORDは本番環境用です。
次にファイル「compose.yml」を以下のように修正します。
services:
  api:
    container_name: go-opensearch-api
    build:
      context: .
      dockerfile: ./docker/local/go/Dockerfile
    command: air -c .air.toml
    volumes:
      - ./src:/go/src
    ports:
      - "8080:8080"
    env_file:
      - .env
    tty: true
    stdin_open: true
    depends_on:
      - opensearch-node1
      - opensearch-node2
    networks:
      - opensearch-net
  # OpenSearchのドキュメントページからDockerfileの内容をコピー
  # https://docs.opensearch.org/latest/install-and-configure/install-opensearch/docker/#sample-docker-compose-file-for-development
  opensearch-node1:
    container_name: opensearch-node1
    build:
      context: .
      dockerfile: ./docker/local/db/Dockerfile
    environment:
      - cluster.name=opensearch-cluster # Name the cluster
      - node.name=opensearch-node1 # Name the node that will run in this container
      - discovery.seed_hosts=opensearch-node1,opensearch-node2 # Nodes to look for when discovering the cluster
      - cluster.initial_cluster_manager_nodes=opensearch-node1,opensearch-node2 # Nodes eligibile to serve as cluster manager
      - bootstrap.memory_lock=true # Disable JVM heap memory swapping
      - "OPENSEARCH_JAVA_OPTS=-Xms512m -Xmx512m" # Set min and max JVM heap sizes to at least 50% of system RAM
      - "DISABLE_INSTALL_DEMO_CONFIG=true" # Prevents execution of bundled demo script which installs demo certificates and security configurations to OpenSearch
      - "DISABLE_SECURITY_PLUGIN=true" # Disables Security plugin
    ulimits:
      memlock:
        soft: -1 # Set memlock to unlimited (no soft or hard limit)
        hard: -1
    nofile:
      soft: 65536 # Maximum number of open files for the opensearch user - set to at least 65536
      hard: 65536
    volumes:
      - opensearch-data1:/usr/share/opensearch/data # Creates volume called opensearch-data1 and mounts it to the container
    ports:
      - 9200:9200 # REST API
      - 9600:9600 # Performance Analyzer
    networks:
      - opensearch-net # All of the containers will join the same Docker bridge network
  opensearch-node2:
    container_name: opensearch-node2
    build:
      context: .
      dockerfile: ./docker/local/db/Dockerfile
    environment:
      - cluster.name=opensearch-cluster # Name the cluster
      - node.name=opensearch-node2 # Name the node that will run in this container
      - discovery.seed_hosts=opensearch-node1,opensearch-node2 # Nodes to look for when discovering the cluster
      - cluster.initial_cluster_manager_nodes=opensearch-node1,opensearch-node2 # Nodes eligibile to serve as cluster manager
      - bootstrap.memory_lock=true # Disable JVM heap memory swapping
      - "OPENSEARCH_JAVA_OPTS=-Xms512m -Xmx512m" # Set min and max JVM heap sizes to at least 50% of system RAM
      - "DISABLE_INSTALL_DEMO_CONFIG=true" # Prevents execution of bundled demo script which installs demo certificates and security configurations to OpenSearch
      - "DISABLE_SECURITY_PLUGIN=true" # Disables Security plugin
    ulimits:
      memlock:
        soft: -1 # Set memlock to unlimited (no soft or hard limit)
        hard: -1
      nofile:
        soft: 65536 # Maximum number of open files for the opensearch user - set to at least 65536
        hard: 65536
    volumes:
      - opensearch-data2:/usr/share/opensearch/data # Creates volume called opensearch-data2 and mounts it to the container
    networks:
      - opensearch-net # All of the containers will join the same Docker bridge network
  opensearch-dashboards:
    image: opensearchproject/opensearch-dashboards:latest
    container_name: opensearch-dashboards
    ports:
      - 5601:5601 # Map host port 5601 to container port 5601
    expose:
      - "5601" # Expose port 5601 for web access to OpenSearch Dashboards
    environment:
      - 'OPENSEARCH_HOSTS=["http://opensearch-node1:9200","http://opensearch-node2:9200"]'
      - "DISABLE_SECURITY_DASHBOARDS_PLUGIN=true" # disables security dashboards plugin in OpenSearch Dashboards
    networks:
      - open search-net
volumes:
  opensearch-data1:
  opensearch-data2:
networks:
  opensearch-net:
※今回の例ではapiコンテナにもnetworksの設定が必要です。またopensearchコンテナをそれぞれDockerfile化しています。
次に以下のコマンドを実行し、Dockerコンテナをビルドします。
$ docker compose build --no-cache
次に以下のコマンドを実行し、Go言語の初期化処理を行います。
$ docker compose run --rm api go mod init go-opensearch
$ docker compose run --rm api go mod tidy
$ docker compose run --rm api air init
次に以下のコマンドを実行し、Dockerコンテナの再ビルドおよび起動します。
$ docker compose build --no-cache
$ docker compose up -d
次に以下のコマンドを実行し、Dockerコンテナの起動を確認します。
$ docker compose ps
コマンド実行後、以下のようにapiコンテナも合わせて起動していればOKです。

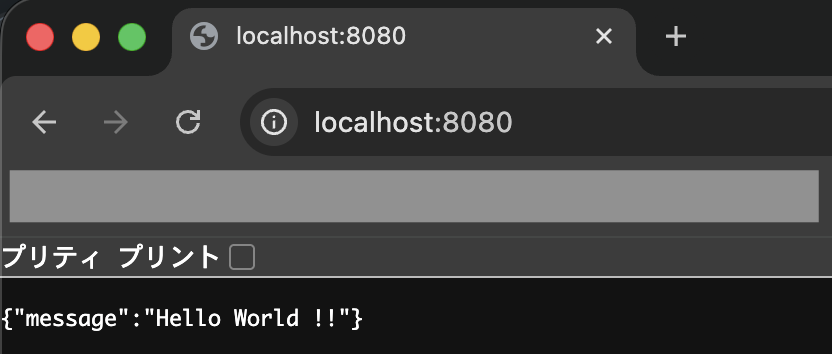
次にブラウザで「http://localhost:8080」を開き、JSON形式で想定通りのメッセージが出力されていればOKです。
OpenSearchを操作するサンプルAPIを追加
次にGo言語(Golang)でOpenSearchを操作するサンプルAPIを作って試します。
まずは以下のコマンドを実行し、各種ファイルを作成します。
$ mkdir -p src/internal/infrastructure/database && touch src/internal/infrastructure/database/opensearch.go
次に作成したファイルを以下のように記述します。
・「src/internal/infrastructure/database/opensearch.go」
package database

import (
    "os"

    opensearch "github.com/opensearch-project/opensearch-go/v2"
)

func NewOpensearchClient() (*opensearch.Client, error) {
    env := os.Getenv("ENV")
    url := os.Getenv("OPENSEARCH_URL")

    // コンフィグ設定
    cfg := opensearch.Config{
       Addresses: []string{url},
    }

    // 本番環境の場合
    if env == "production" {
        cfg.Username = os.Getenv("OPENSEARCH_USERNAME")
        cfg.Password = os.Getenv("OPENSEARCH_PASSWORD")
    }

    return opensearch.NewClient(cfg)
}
※これはOpenSearchへの接続用の設定ファイルです。
次にファイル「src/main.go」を以下のように修正します。
package main

import (
    "encoding/json"
    "fmt"
    "log/slog"
    "net/http"
    "os"
    "strings"

    "github.com/labstack/echo/v4"

    "go-opensearch/internal/infrastructure/database"
)

// Product作成用リクエストボディの構造体
type CreateProductRequestBody struct {
    ID    string `json:"id"`
    Name  string `json:"name"`
    Price int    `json:"price"`
}

// Product更新用リクエストボディの構造体
type UpdateProductRequestBody struct {
    Name  string `json:"name"`
    Price int    `json:"price"`
}

// 検索用リクエストボディの構造体
type SearchRequestBody struct {
    Query string `json:"query"`
    Size  int    `json:"size"`
}

// Productのレスポンス結果用の構造体
type ProductResponse struct {
    ID string `json:"_id"`
    Source struct {
        Name  string `json:"name"`
        Price int    `json:"price"`
    } `json:"_source"`
}

func main() {
    // echoのルーター設定
    e := echo.New()

    e.GET("/", func(c echo.Context) error {
        // レスポンス結果の設定
        res := map[string]string{
            "message": "Hello World !!",
        }

        return c.JSON(http.StatusOK, res)
    })

    // Opensearchクライアントの取得
    oc, err := database.NewOpensearchClient()
    if err != nil {
        slog.Error(fmt.Sprintf("failed to create opensearch client: %v", err))
        os.Exit(1)
    }

    // サンプルAPIを追加
    apiV1 := e.Group("/api/v1")

    // productデータ作成
    apiV1.POST("/opensearch/products", func(c echo.Context) error {
        // リクエストボディの取得
        var reqBody CreateProductRequestBody
        if err := c.Bind(&reqBody); err != nil {
            return err
        }

        // バリデーションチェック
        if reqBody.Name == "" {
            return echo.NewHTTPError(http.StatusBadRequest, "name is required")
        }

        ctx := c.Request().Context()

        // データ作成処理
        res, err := oc.Index(
            "products",
            strings.NewReader(fmt.Sprintf(`{"name": "%s", "price": %d}`, reqBody.Name, reqBody.Price)),
            oc.Index.WithContext(ctx),
            oc.Index.WithDocumentID(reqBody.ID),
            oc.Index.WithRefresh("true"),
        )
        if err != nil {
            errMsg := fmt.Sprintf("failed to create product: %v", err)
            return echo.NewHTTPError(http.StatusInternalServerError, errMsg)
        }
        defer res.Body.Close()

        // マッピング
        var resResult map[string]interface{}
        if err := json.NewDecoder(res.Body).Decode(&resResult); err != nil {
            errMsg := fmt.Sprintf("failed to decode response body: %v", err)
            return echo.NewHTTPError(http.StatusInternalServerError, errMsg)
        }

        // 作成したproductの取得処理
        getProduct, err := oc.Get(
            "products",
            resResult["_id"].(string),
            oc.Get.WithContext(ctx),
        )
        if err != nil {
            errMsg := fmt.Sprintf("failed to get product: %v", err)
            return echo.NewHTTPError(http.StatusInternalServerError, errMsg)
        }
        defer getProduct.Body.Close()

        // マッピング
        var product ProductResponse
        if err := json.NewDecoder(getProduct.Body).Decode(&product); err != nil {
            errMsg := fmt.Sprintf("failed to decode response body: %v", err)
            return echo.NewHTTPError(http.StatusInternalServerError, errMsg)
        }

        // レスポンス結果を返す
        return c.JSON(http.StatusCreated, product)
    })

    // データ検索
    apiV1.POST("/opensearch/search/:index", func(c echo.Context) error {
        // リクエストパラメータの取得
        index := c.Param("index")

        // リクエストボディの取得
        var reqBody SearchRequestBody
        if err := c.Bind(&reqBody); err != nil {
            return err
        }

        // バリデーションチェック
        if reqBody.Query == "" {
            return echo.NewHTTPError(http.StatusBadRequest, "query is required")
        }

        if reqBody.Size == 0 {
            return echo.NewHTTPError(http.StatusBadRequest, "size is required")
        }

        if reqBody.Size < 0 {
            return echo.NewHTTPError(http.StatusBadRequest, "size must be greater than 0")
        }

        ctx := c.Request().Context()

        // 検索処理
        res, err := oc.Search(
            oc.Search.WithIndex(index),
            oc.Search.WithBody(strings.NewReader(reqBody.Query)),
            oc.Search.WithSize(reqBody.Size),
            oc.Search.WithContext(ctx),
        )
        if err != nil {
            errMsg := fmt.Sprintf("failed to search: %v", err)
            return echo.NewHTTPError(http.StatusInternalServerError, errMsg)
        }
        defer res.Body.Close()

        // マッピング
        var result map[string]interface{}
        if err := json.NewDecoder(res.Body).Decode(&result); err != nil {
            errMsg := fmt.Sprintf("failed to decode response body: %v", err)
            return echo.NewHTTPError(http.StatusInternalServerError, errMsg)
        }

        // 対象データが存在しない場合は空の配列を返す
        if result["hits"] == nil {
            return c.JSON(http.StatusOK, []interface{}{})
        }

        // 対象データの取り出し
        hitsObj := result["hits"].(map[string]interface{})
        hits := hitsObj["hits"].([]interface{})

        // レスポンス結果を返す
        return c.JSON(http.StatusOK, hits)
    })

    // productデータ取得
    apiV1.GET("/opensearch/products/:id", func(c echo.Context) error {
        // リクエストパラメータの取得
        id := c.Param("id")

        ctx := c.Request().Context()

        // 対象のproduct取得処理
        res, err := oc.Get(
            "products",
            id,
            oc.Get.WithContext(ctx),
        )
        if err != nil {
            errMsg := fmt.Sprintf("failed to get product: %v", err)
            return echo.NewHTTPError(http.StatusInternalServerError, errMsg)
        }
        defer res.Body.Close()

        // 対象データが存在しない場合に空のオブジェクトを返す
        if res.StatusCode == http.StatusNotFound {
            return c.JSON(http.StatusOK, map[string]interface{}{})
        }

        // マッピング
        var product ProductResponse
        if err := json.NewDecoder(res.Body).Decode(&product); err != nil {
            errMsg := fmt.Sprintf("failed to decode response body: %v", err)
            return echo.NewHTTPError(http.StatusInternalServerError, errMsg)
        }

        // レスポンス結果を返す
        return c.JSON(http.StatusOK, product)
    })

    // productデータ更新
    apiV1.PUT("/opensearch/products/:id", func(c echo.Context) error {
        // リクエストパラメータの取得
        id := c.Param("id")

        // リクエストボディの取得
        var reqBody UpdateProductRequestBody
        if err := c.Bind(&reqBody); err != nil {
            return err
        }

        // バリデーションチェック
        if reqBody.Name == "" {
            return echo.NewHTTPError(http.StatusBadRequest, "name is required")
        }

        ctx := c.Request().Context()

        // 対象productの存在チェック
        check, err := oc.Get(
            "products",
            id,
            oc.Get.WithContext(ctx),
        )
        if err != nil {
            errMsg := fmt.Sprintf("failed to get product: %v", err)
            return echo.NewHTTPError(http.StatusInternalServerError, errMsg)
        }
        defer check.Body.Close()

        // 対象データが存在しない場合はエラー
        if check.StatusCode == http.StatusNotFound {
            return echo.NewHTTPError(http.StatusNotFound, "product not found with id")
        }

        // 対象のproduct更新
        res, err := oc.Update(
            "products",
            id,
            strings.NewReader(fmt.Sprintf(`{"doc": {"name": "%s", "price": %d}}`, reqBody.Name, reqBody.Price)),
            oc.Update.WithContext(ctx),
            oc.Update.WithRefresh("true"),
        )
        if err != nil {
            errMsg := fmt.Sprintf("failed to update product: %v", err)
            return echo.NewHTTPError(http.StatusInternalServerError, errMsg)
        }
        defer res.Body.Close()

        // 更新したproductの取得処理
        getProduct, err := oc.Get(
            "products",
            id,
            oc.Get.WithContext(ctx),
        )
        if err != nil {
            errMsg := fmt.Sprintf("failed to get product: %v", err)
            return echo.NewHTTPError(http.StatusInternalServerError, errMsg)
        }
        defer getProduct.Body.Close()

        // マッピング
        var product ProductResponse
        if err := json.NewDecoder(getProduct.Body).Decode(&product); err != nil {
            errMsg := fmt.Sprintf("failed to decode response body: %v", err)
            return echo.NewHTTPError(http.StatusInternalServerError, errMsg)
        }

        // レスポンス結果を返す
        return c.JSON(http.StatusOK, product)
    })

    // productデータ削除
    apiV1.DELETE("/opensearch/products/:id", func(c echo.Context) error {
        // リクエストパラメータの取得
        id := c.Param("id")

        ctx := c.Request().Context()

        // 対象productの存在チェック
        check, err := oc.Get(
            "products",
            id,
            oc.Get.WithContext(ctx),
        )
        if err != nil {
            errMsg := fmt.Sprintf("failed to get product: %v", err)
            return echo.NewHTTPError(http.StatusInternalServerError, errMsg)
        }
        defer check.Body.Close()

        // 対象データが存在しない場合はエラー
        if check.StatusCode == http.StatusNotFound {
            return echo.NewHTTPError(http.StatusNotFound, "product not found with id")
        }

        // 対象のproduct削除
        _, err = oc.Delete(
            "products",
            id,
            oc.Delete.WithContext(ctx),
        )
        if err != nil {
            errMsg := fmt.Sprintf("failed to delete product: %v", err)
            return echo.NewHTTPError(http.StatusInternalServerError, errMsg)
        }

        return c.NoContent(http.StatusNoContent)
    })

    // ログ出力
    slog.Info("start go-opensearch")

    // サーバー起動
    e.Logger.Fatal(e.Start(":8080"))
}
※データ検索のAPIで「oc.Search.WithSize(reqBody.Size)」で最大件数を指定できますが、デフォルト設定では最大「10,000」件が上限のようで、それを超える大量データを扱いたい場合は別途処理方法の検討(DB側の設定変更 or scrollを使ってバッチ的に取得など)が必要になります。
次に以下のコマンドを実行し、go.modの更新からDockerコンテナの再ビルドおよび再起動を行います。
$ docker compose exec api go mod tidy
$ docker compose down -v
$ docker compose build --no-cache
$ docker compose up -d
次に上記で作成した「opensearch/create_index.sh」を使って以下のコマンドを実行し、インデックスを登録します。
$ ./opensearch/create_index.sh local
サンプルAPIを実行して試す
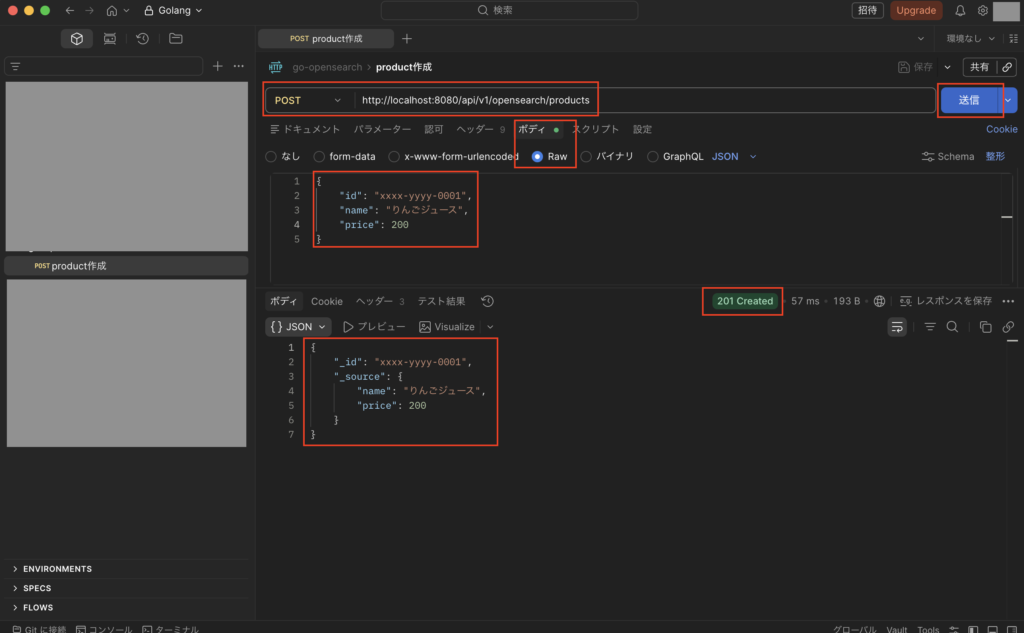
次に上記で作成したサンプルAPIをPostmanを使って試します。
まずはPOSTメソッドで「http://localhost:8080/api/v1/opensearch/products」を実行し、下図のようにステータス201で想定通りの結果になればOKです。
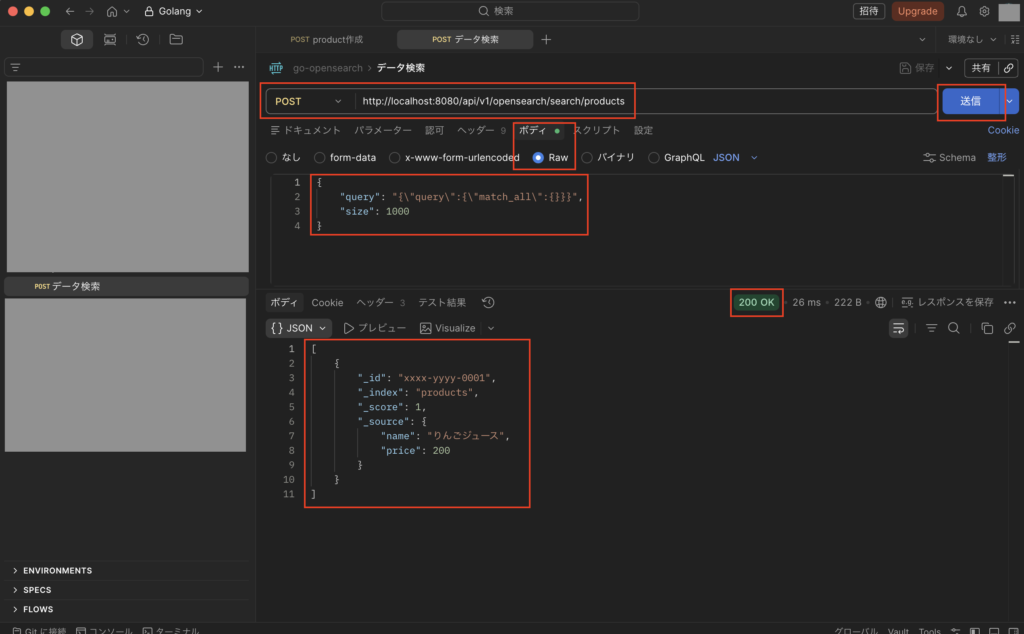
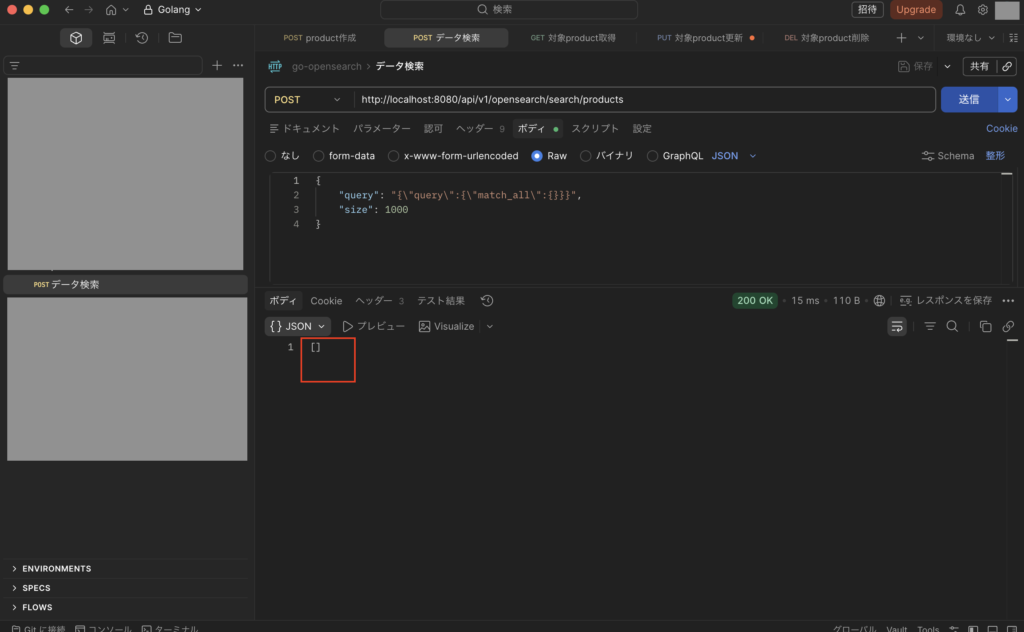
次にPOSTメソッドで「http://localhost:8080/api/v1/opensearch/search/products」を実行します。
・リクエストボディ
{
  "query": "{\"query\":{\"match_all\":{}}}",
  "size": 1000
}
実行後、下図のようにステータス200で想定通りの結果になればOKです。
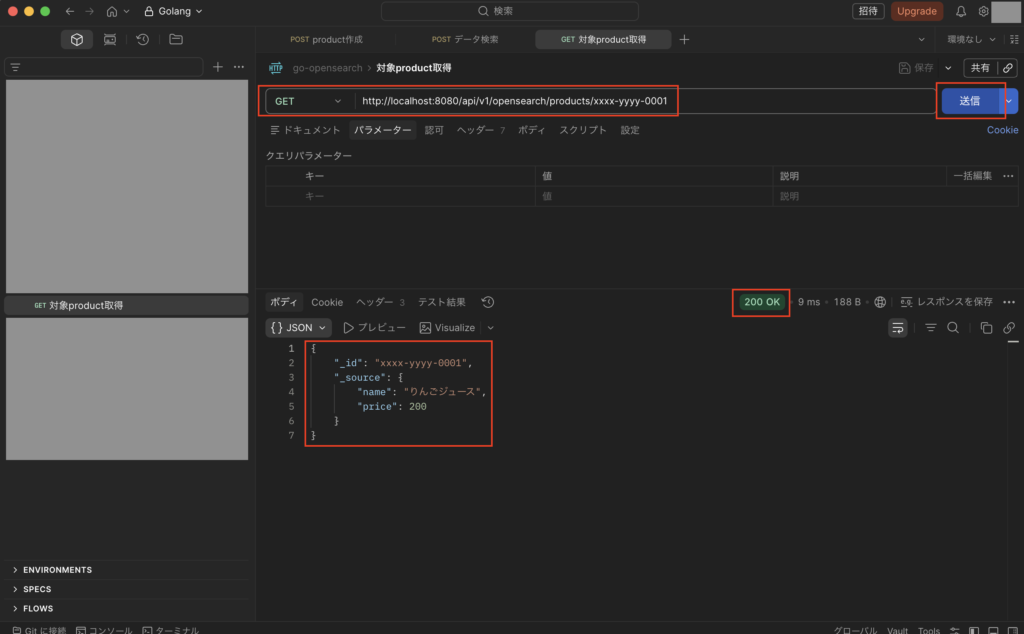
次にGETメソッドで「http://localhost:8080/api/v1/opensearch/products/{対象データのid}」を実行し、下図のようにステータス200で想定通りの結果になればOKです。
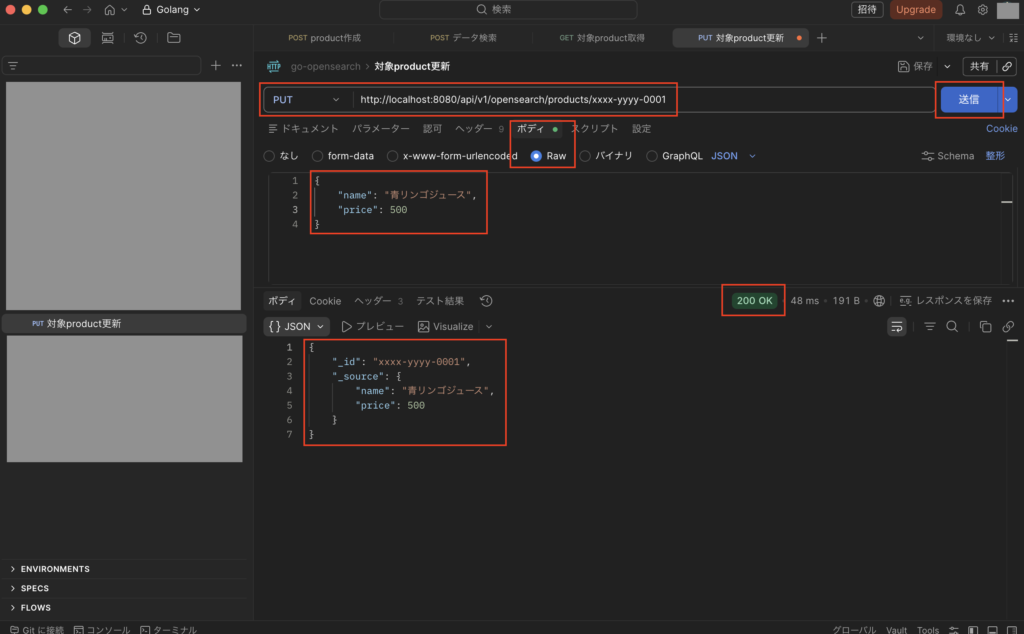
次にPUTメソッドで「http://localhost:8080/api/v1/opensearch/products/{対象データのid}」を実行し、下図のようにステータス200で想定通りの結果になればOKです。
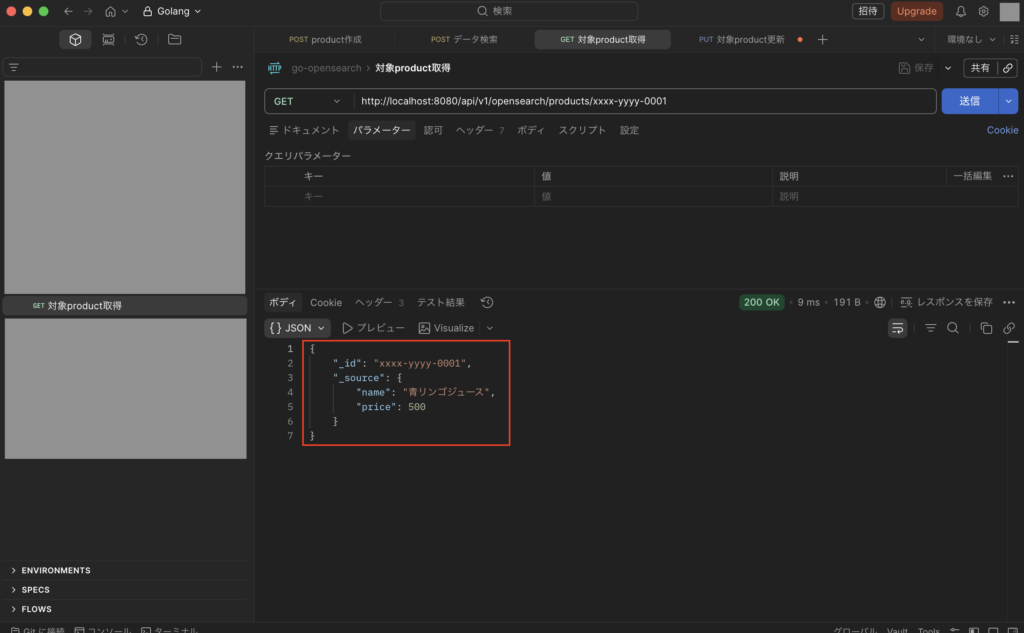
次に再度GETメソッドで「http://localhost:8080/api/v1/opensearch/products/{対象データのid}」を実行し、下図のようにステータス200で想定通りの結果になればOKです。
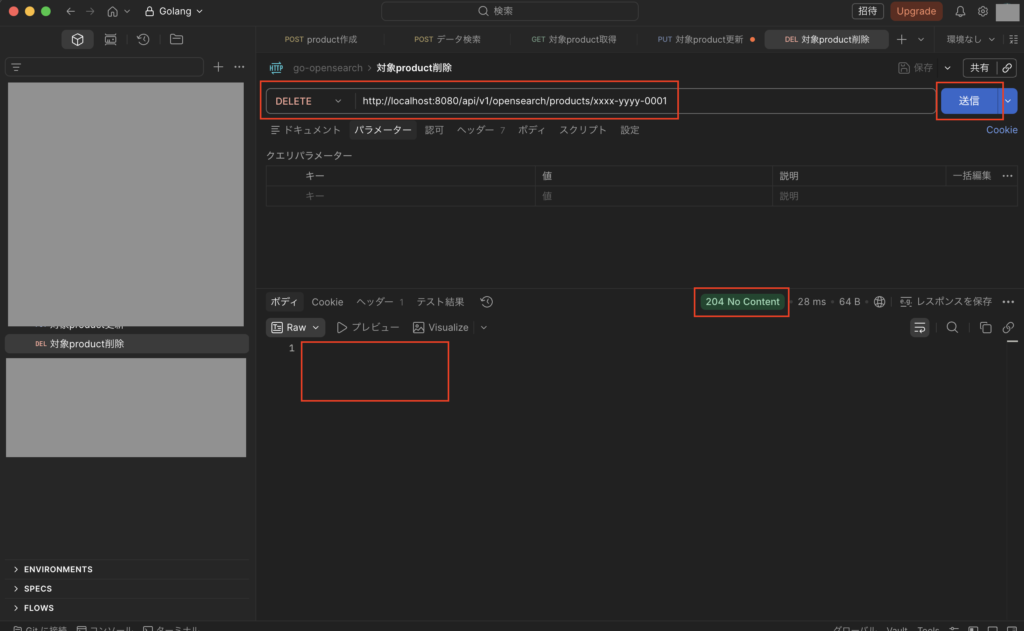
次にDELETEメソッドで「http://localhost:8080/api/v1/opensearch/products/{対象データのid}」を実行し、下図のようにステータス204で想定通りの結果になればOKです。
次に再度POSTメソッドで「http://localhost:8080/api/v1/opensearch/search/products」を実行し、下図のようにステータス200で想定通りの結果になればOKです。
最後に
今回はGo言語(Golang)でOpenSearch(Elasticsearch)の使い方についてまとめました。
Webサービスの中で検索バーを付け、商品検索するような機能を実装したりする際には、OpenSearch(Elasticsearch)のような検索エンジンが必要になってきます。
今回は基本的な使い方についてまとめたので、興味がある方はぜひ参考にしてみて下さい。


コメント