
こんにちは。Tomoyuki(@tomoyuki65)です。
マイクロサービスなどでバックエンドAPIが複数あり、エンドポイントが多くなりすぎてフロントエンド側(Webとアプリなど)で使いづらくなった場合、GraphQLのBFF(Backend For Frontend)に集約するケースがあったりします。
その際にBFFはフロントエンドに合わせてNest.jsなどのJavaScript(TypeScript)系のフレームワークで作ることが多いと思いますが、パフォーマンスを最重視するのであればGo言語(Golang)のGraphQLで作る方が最適です。
そこでこの記事では、Go言語(Golang)でGraphQLのBFFを開発する方法についてまとめます。
Go言語(Golang)でGraphQLのBFFを開発する方法まとめ
まずは以下のコマンド実行して各種ファイルを作成します。
$ mkdir go-graphql && cd go-graphql
$ mkdir -p deploy/docker/local && touch deploy/docker/local/Dockerfile
$ mkdir src
$ touch compose.yml
※いつものようにDockerを使って環境構築するため、事前にDockerが使える環境を準備して下さい。
次に作成したファイルをそれぞれ以下のように記述します。
・「deploy/docker/local/Dockerfile」
FROM golang:1.25.4-alpine3.21

# タイムゾーン設定
ENV TZ=Asia/Tokyo

WORKDIR /go/src

COPY ./src .

# go.modがあれば依存関係をインストール
RUN if [ -f ./go.mod ]; then \
      go install; \
    fi

# gqlgenをインストール
RUN go install github.com/99designs/gqlgen@v0.17.83

# 開発用のライブラリをインストール
RUN go install github.com/air-verse/air@v1.63.1
RUN go install honnef.co/go/tools/cmd/staticcheck@latest
RUN go install go.uber.org/mock/mockgen@latest

EXPOSE 8080
※Goのバージョン「1.25.4」に合わせて、GraphQL用の「gqlgen」のバージョンは「0.17.83」、ホットリロード用の「air」のバージョンは「1.63.1」に固定しています。また静的コード解析に「staticcheck」、テスト用のモック化に「mockgen」を利用します。
・「compose.yml」
services:
  graphql:
    container_name: go-graphql
    build:
      context: .
      dockerfile: ./deploy/docker/local/Dockerfile
    command: air -c .air.toml
    volumes:
      - ./src:/go/src
    ports:
      - "8080:8080"
    tty: true
    stdin_open: true
次に以下のコマンドを実行し、Dockerコンテナをビルドします。
$ docker compose build --no-cache
次に以下のコマンドを実行し、Goとgqlgenとairの初期化処理を行います。
$ docker compose run --rm graphql go mod init go-graphql
$ docker compose run --rm graphql go get github.com/99designs/gqlgen
$ docker compose run --rm graphql gqlgen init
$ docker compose run --rm graphql air init
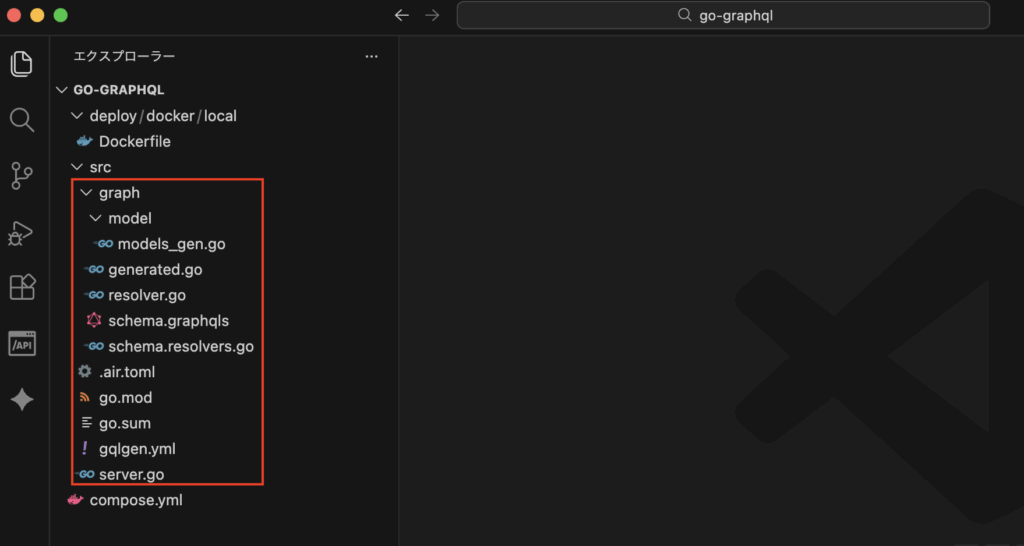
コマンド実行後、下図のように各種ファイルが作成されればOKです。
次に以下のコマンドを実行し、コンテナを起動します。
$ docker compose up -d
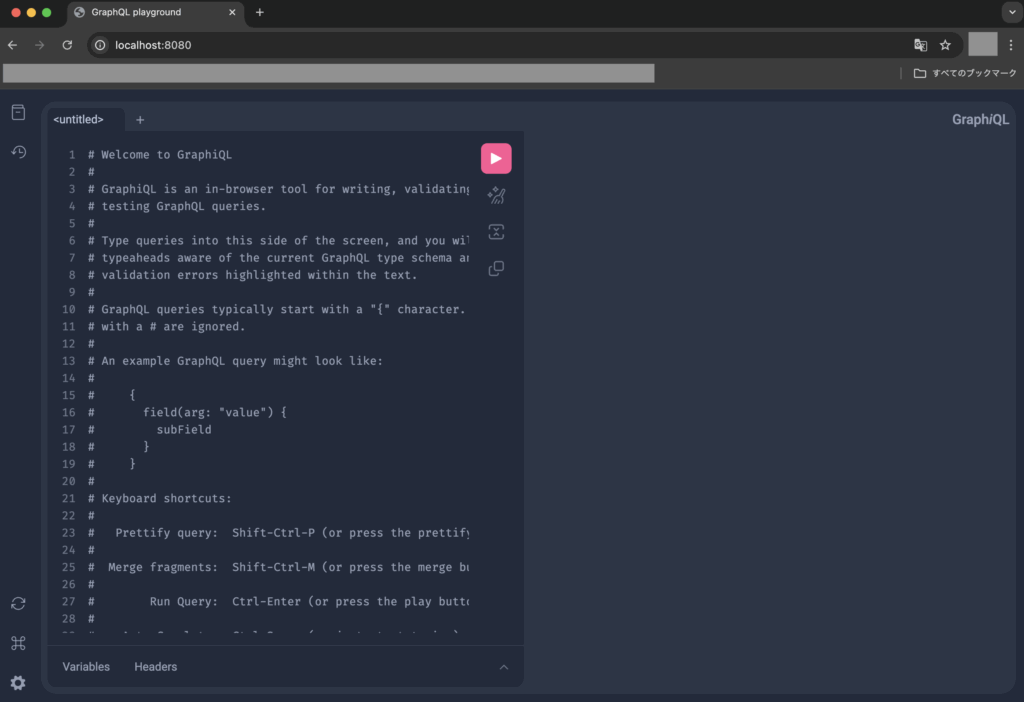
次にブラウザで「http://localhost:8080」にアクセスし、下図のようなGraphQLのPlayground画面が表示されればOKです。
デフォルトのresolver(リゾルバー)を修正してテスト
上記で作成されたデフォルトのresolver(リゾルバー)では実行時にエラーになるように設定されているため、ファイル「src/graph/schema.resolvers.go」にあるTodosの処理を以下のように修正した後にテストしてみます。
・「src/graph/schema.resolvers.go」
package graph

// This file will be automatically regenerated based on the schema, any resolver implementations
// will be copied through when generating and any unknown code will be moved to the end.
// Code generated by github.com/99designs/gqlgen version v0.17.83

import (
    "context"
    "fmt"
    "go-graphql/graph/model"
)

// CreateTodo is the resolver for the createTodo field.
func (r *mutationResolver) CreateTodo(ctx context.Context, input model.NewTodo) (*model.Todo, error) {
    panic(fmt.Errorf("not implemented: CreateTodo - createTodo"))
}

// Todos is the resolver for the todos field.
func (r *queryResolver) Todos(ctx context.Context) ([]*model.Todo, error) {
    // Todoを作成
    todo := &model.Todo{
        ID: "T00001",
        Text: "タスク1",
        Done: false,
        User: &model.User{
            ID: "xxxx-xxxx-0001",
            Name: "田中太郎",
        },
    }

    // 戻り値の設定
    todos := []*model.Todo{todo}

    return todos, nil
}

// Mutation returns MutationResolver implementation.
func (r *Resolver) Mutation() MutationResolver { return &mutationResolver{r} }

// Query returns QueryResolver implementation.
func (r *Resolver) Query() QueryResolver { return &queryResolver{r} }

type mutationResolver struct{ *Resolver }
type queryResolver struct{ *Resolver }
※リゾルバーとはGraphQLにおけるデータの取り方を実装する部分です。ファイル「src/graph/schema.graphqls」の定義より自動生成されたリゾルバーファイルが「src/graph/schema.resolvers.go」になります。今回使用しているライブラリ「gqlgen」を使うことで、.graphqlsファイルを定義してから.resolvers.goファイルを自動生成することができ、リゾルバーファイル内のQueryやMutationの中身を記述することで実行時の処理を作れます。
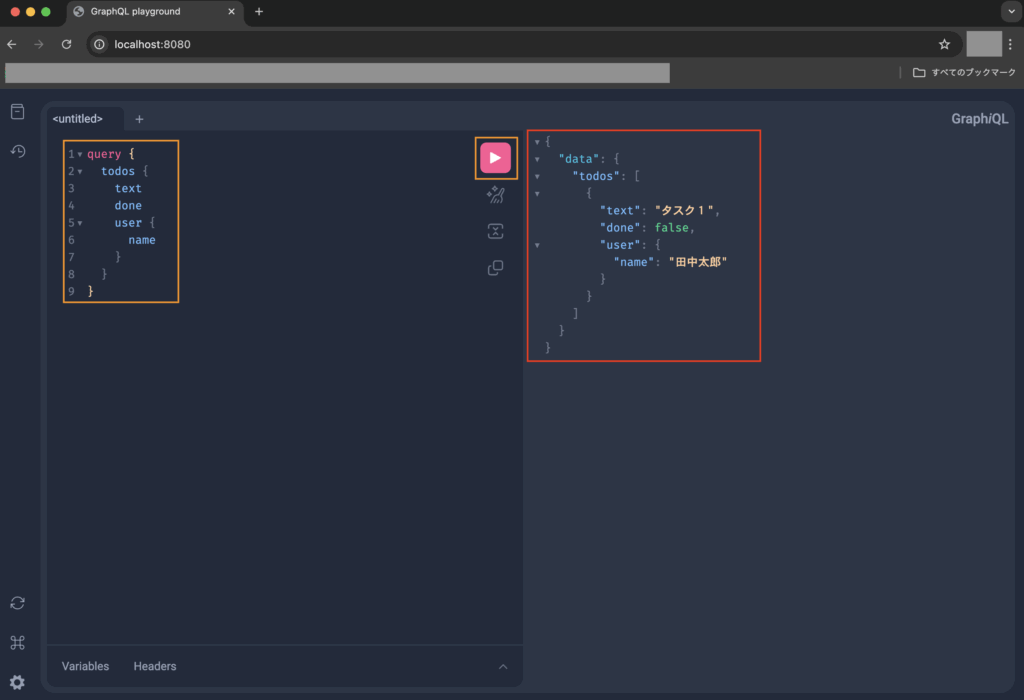
次にGraphQLのPlayground画面から以下のクエリを実行します。
query {
  todos {
    text
    done
    user {
      name
    }
  }
}
クエリ実行後、下図のように指定したプロパティのデータのみが取得できていればOKです。
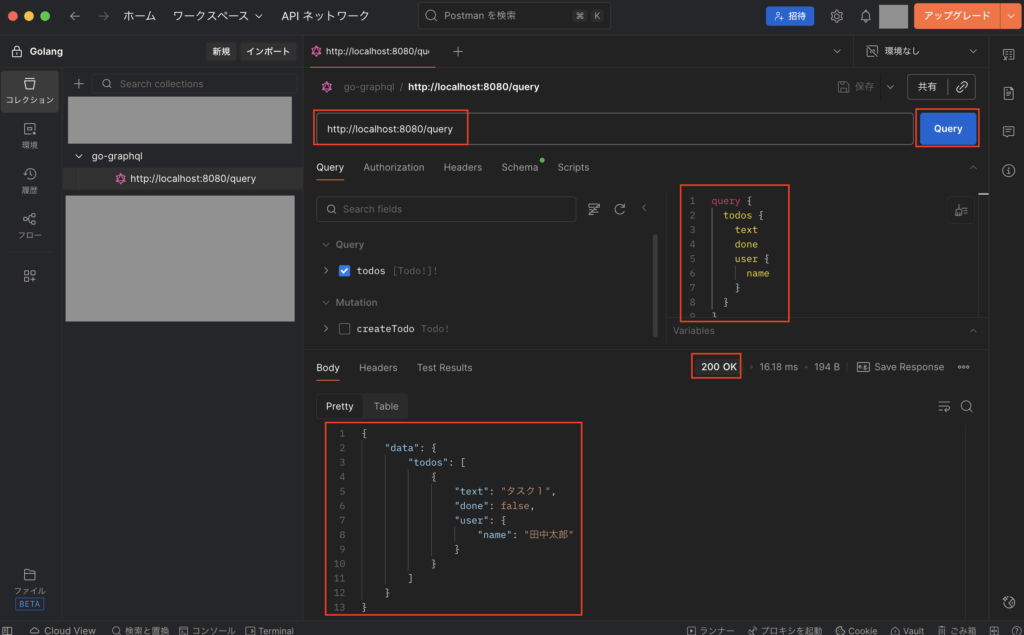
尚、Postmanを使った実行を試したい場合は、エンドポイントとして「http://localhost:8080/query」を使います。
次に以下のコマンドを実行し、一度サーバーを停止しておきます。
$ docker compose down
userスキーマの追加を例にGraphQLのAPIを作成する
次にuserスキーマの追加を例にGraphQLのAPIを作成してみます。
まずは上記でも使用したデフォルトのファイル「src/graph/schema.graphqls」にある既存の定義が邪魔なので、以下のように修正します。
・「src/graph/schema.graphqls」
# GraphQL schema example
#
# https://gqlgen.com/getting-started/

type Query {
  getSample: String!
}

input SampleInput {
  text: String!
}

type Mutation {
  updateSample(input: SampleInput!): String!
}
次に以下のコマンドを実行し、日付項目のカスタムスカラー用ファイルを作成します。
$ mkdir -p src/graph/scalars && touch src/graph/scalars/datetime.go
次に作成したファイル「src/graph/scalars/datetime.go」を以下のように記述します。
・「src/graph/scalars/datetime.go」
package scalars

import (
    "fmt"
    "time"

    "github.com/99designs/gqlgen/graphql"
)

// Goのtime.Time型をGraphQLのモデル用にフォーマット変換
func MarshalDateTime(t time.Time) graphql.Marshaler {
    return graphql.MarshalString(t.Format(time.RFC3339))
}

// Goのtime.Timeがnilの場合(*time.Time)
func MarshalNullableDateTime(t *time.Time) graphql.Marshaler {
    if t == nil {
        return graphql.Null
    }
    return MarshalDateTime(*t)
}

// Goのtime.Time型へのフォーマット変換
func UnmarshalDateTime(v interface{}) (time.Time, error) {
    s, ok := v.(string)
    if !ok {
        return time.Time{}, fmt.Errorf("DateTime must be a string")
    }
    return time.Parse(time.RFC3339, s)
}
次にスキーマ定義でカスタムスカラーを使えるようにするため、gqlgenの設定ファイル「src/gqlgen.yml」を以下のように修正します。
・・・

models:
  ID:
    model:
      - github.com/99designs/gqlgen/graphql.ID
      - github.com/99designs/gqlgen/graphql.Int
      - github.com/99designs/gqlgen/graphql.Int64
      - github.com/99designs/gqlgen/graphql.Int32
  # gqlgen provides a default GraphQL UUID convenience wrapper for github.com/google/uuid
  # but you can override this to provide your own GraphQL UUID implementation
  UUID:
    model:
      - github.com/99designs/gqlgen/graphql.UUID

  # The GraphQL spec explicitly states that the Int type is a signed 32-bit
  # integer. Using Go int or int64 to represent it can lead to unexpected
  # behavior, and some GraphQL tools like Apollo Router will fail when
  # communicating numbers that overflow 32-bits.
  #
  # You may choose to use the custom, built-in Int64 scalar to represent 64-bit
  # integers, or ignore the spec and bind Int to graphql.Int / graphql.Int64
  # (the default behavior of gqlgen). This is fine in simple use cases when you
  # do not need to worry about interoperability and only expect small numbers.
  Int:
    model:
      - github.com/99designs/gqlgen/graphql.Int32
  Int64:
    model:
      # graphql.Intは不要なのでコメントアウト
      # - github.com/99designs/gqlgen/graphql.Int
      - github.com/99designs/gqlgen/graphql.Int64
  # 日付項目用のカスタムスカラーを定義
  DateTime:
    model: go-graphql/graph/scalars.DateTime
※modelsのInt64の修正と、DateTimeの追加を行う。
次に以下のコマンドを実行し、userスキーマ用のファイルを作成します。
$ touch src/graph/user.graphqls
次に作成したファイル「src/graph/user.graphqls」を以下のように記述します。
・「src/graph/user.graphqls」
# カスタムスカラーを利用
scalar Int64
scalar DateTime

# ユーザー
type User {
  id: Int64!
  uid: String!
  last_name: String!
  first_name: String!
  email: String!
  created_at: DateTime!
  updated_at: DateTime!
  deleted_at: DateTime
}

# Queryにフィールドを追加
extend type Query {
  user(uid: String!): User
}
※既にファイル「src/graph/schema.graphqls」にQueryが定義済みのため、extendを使ってQueryにフィールドを追加します。尚、GraphQLにおいてデータ取得系はQueryを使い、それ以外の更新処理系などはMutationを使います。
次に以下のコマンドを実行し、userスキーマ等から各種ファイルを更新します。
$ docker compose run --rm graphql gqlgen generate※リゾルバーファイル「src/graph/user.resolvers.go」が自動生成します。
カスタムロガーの追加
次に以下のコマンドを実行し、カスタムロガー用のファイルを作成します。
$ mkdir -p src/internal/logger && touch src/internal/logger/logger.go
次に作成したファイル「src/internal/logger/logger.go」を以下のように記述します。
・「src/internal/logger/logger.go」
package logger

import (
    "context"
    "log/slog"
    "os"
    "runtime"
)

// カスタムロガー用のハンドラー設定
type SlogHandler struct {
    slog.Handler
}

func (h *SlogHandler) Handle(ctx context.Context, r slog.Record) error {
    // rをコピー
    newRecord := r.Clone()

    // runtimeからプログラムカウンターを取得して上書き
    pc, _, _, ok := runtime.Caller(4)
    if ok {
        newRecord.PC = pc
    }

    // コンテキストに設定した値からAddAttrsを追加
    requestID, ok := ctx.Value("requestID").(string)
    if ok {
        newRecord.AddAttrs(slog.Attr{Key: "requestID", Value: slog.String("requestID", requestID).Value})
    }

    return h.Handler.Handle(ctx, newRecord)
}

var slogHandler = &SlogHandler{
    slog.NewJSONHandler(os.Stdout, nil),
}

var slogHandlerAddSource = &SlogHandler{
    slog.NewJSONHandler(os.Stdout, &slog.HandlerOptions{
        AddSource: true,
    }),
}

// slogの定義
var logger = slog.New(slogHandler)
var loggerAddSource = slog.New(slogHandlerAddSource)

// カスタムロガー用のインターフェース設定
type Logger interface {
    Info(addSource bool, ctx context.Context, message string)
    Warn(addSource bool, ctx context.Context, message string)
    Error(addSource bool, ctx context.Context, message string)
}

// カスタムロガーの定義
type customLogger struct{}

func NewLogger() Logger {
    return &customLogger{}
}

func (cl *customLogger) Info(addSource bool, ctx context.Context, message string) {
    if addSource {
        loggerAddSource.InfoContext(ctx, message)
    } else {
        logger.InfoContext(ctx, message)
    }
}

func (cl *customLogger) Warn(addSource bool, ctx context.Context, message string) {
    if addSource {
        loggerAddSource.WarnContext(ctx, message)
    } else {
        logger.WarnContext(ctx, message)
    }
}

func (cl *customLogger) Error(addSource bool, ctx context.Context, message string) {
    if addSource {
        loggerAddSource.ErrorContext(ctx, message)
    } else {
        logger.ErrorContext(ctx, message)
    }
}
次に以下のコマンドを実行し、テストコードのモック化用ファイルも作成しておきます。
$ docker compose run --rm graphql mockgen -source=./internal/logger/logger.go -destination=./internal/logger/mock_logger/mock_logger.go
userドメインモデルの追加
次に以下のコマンドを実行し、userドメインモデル用のファイルを作成します。
$ mkdir -p src/internal/domain/user && touch src/internal/domain/user/user.go
次に作成したファイル「src/internal/domain/user/user.go」を以下のように記述します。
・「src/internal/domain/user/user.go」
package user

import (
    "time"
)

type User struct {
    ID        int64      `json:"-"`
    UID       string     `json:"uid"`
    LastName  string     `json:"last_name"`
    FirstName string     `json:"first_name"`
    Email     string     `json:"email"`
    CreatedAt time.Time  `json:"created_at"`
    UpdatedAt time.Time  `json:"updated_at"`
    DeletedAt *time.Time `json:"deleted_at"`
}
userクライアントの追加
次に以下のコマンドを実行し、userクライアント用の各種ファイルを作成します。
$ mkdir -p src/internal/client/user
$ touch src/internal/client/user/user.go src/internal/client/user/http_client.go
次に作成したファイルをそれぞれ以下のように記述します。
・「src/internal/client/user/user.go」
package user

import (
    "context"

    model "go-graphql/internal/domain/user"
)

type UserClient interface {
    FindByUID(ctx context.Context, uid string) (*model.User, error)
}
・「src/internal/client/user/http_client.go」
package user

import (
    "context"
    "net/http"
    "time"

    model "go-graphql/internal/domain/user"
)

type userHttpClient struct {
    httpClient *http.Client
    baseURL string
}

func NewUserHttpClient(httpClient *http.Client, baseURL string) UserClient {
    return &userHttpClient{
        httpClient: httpClient,
        baseURL: baseURL,
    }
}

func (c *userHttpClient) FindByUID(_ctx context.Context, uid string) (*model.User, error) {
    // データを返す例(実際にはc.httpClientを使って外部APIを実行する想定)
    var user *model.User

    if uid == "xxxx-xxxx-xxxx-0001" {
        user = &model.User{
            ID: 1,
            UID: "xxxx-xxxx-xxxx-0001",
            LastName: "田中",
            FirstName: "太郎",
            Email: "t.tanaka@example.com",
            CreatedAt: time.Now(),
            UpdatedAt: time.Now(),
            DeletedAt: nil,
        }
    } else {
        // 空のオブジェクトが帰ってきた場合を想定
        user = &model.User{
            ID: 0,
            UID: "",
            LastName: "",
            FirstName: "",
            Email: "",
            CreatedAt: time.Time{},
            UpdatedAt: time.Time{},
            DeletedAt: nil,
        }
    }

    // データ存在チェック
    if user.UID == "" {
        // データが存在しない場合はnilを返す
        return nil, nil
    }

    return user, nil
}
※今回は固定値を返すような例としていますが、実際には外部APIを実行してデータ取得するような想定です。
次に以下のコマンドを実行し、テストコードのモック化用ファイルも作成しておきます。
$ docker compose run --rm graphql mockgen -source=./internal/client/user/user.go -destination=./internal/client/user/mock_user/mock_user.go
共通のリゾルバーにカスタムロガーとクライアントのインスタンスを追加する
次に共通のリゾルバーファイル「src/graph/resolver.go」で、上記で作成したカスタムロガーとクライアントのインスタンスを渡せるように修正します。
・「src/graph/resolver.go」
package graph

// This file will not be regenerated automatically.
//
// It serves as dependency injection for your app, add any dependencies you require here.

import (
    "go-graphql/internal/client/user"
    "go-graphql/internal/logger"
)

type Resolver struct {
    Logger logger.Logger
    UserClient user.UserClient
}
userリゾルバーファイルの修正
次に事前に自動生成したリゾルバーファイル「src/graph/user.resolvers.go」を以下のように修正します。
・「src/graph/user.resolvers.go」
package graph

// This file will be automatically regenerated based on the schema, any resolver implementations
// will be copied through when generating and any unknown code will be moved to the end.
// Code generated by github.com/99designs/gqlgen version v0.17.83

import (
    "context"
    "errors"
    "fmt"
    "go-graphql/graph/model"

    "github.com/99designs/gqlgen/graphql"
)

// User is the resolver for the user field.
func (r *queryResolver) User(ctx context.Context, uid string) (*model.User, error) {
    // コンテキストからクエリのフィールド情報取得
    field := graphql.GetFieldContext(ctx)
    fieldInfo := fmt.Sprintf("[Object=%s, FieldName=%s, Alias=%s]", field.Object, field.Field.Name, field.Field.Alias)

    // リゾルバーの開始ログ出力
    msg := fmt.Sprintf("start resolver User %s", fieldInfo)
    r.Logger.Info(false, ctx, msg)

    // バリデーションチェック
    if len(uid) > 20 {
        msg := fmt.Sprintf("uid is too long %s", fieldInfo)
        r.Logger.Warn(true, ctx, msg)
        return nil, errors.New(msg)
    }

    // 外部APIを実行してデータ取得
    res, err := r.UserClient.FindByUID(ctx, uid)
    if err != nil {
        return nil, err
    }

    // 対象データが存在しない場合はnilを返す
    if res == nil {
        return nil, nil
    }

    // 外部APIのレスポンス結果をGraphQLのモデルにマッピング
    gqlUser := &model.User{
        ID: res.ID,
        UID: res.UID,
        LastName: res.LastName,
        FirstName: res.FirstName,
        Email: res.Email,
        CreatedAt: res.CreatedAt,
        UpdatedAt: res.UpdatedAt,
        DeletedAt: res.DeletedAt,
    }

    return gqlUser, nil
}
※このファイルは自動生成前提のため、作成済みの関数外にグローバル定義を書いても更新次に消えちゃうので注意して下さい。関数内に全て記述するか、別のファイルにまとめておいて呼び出して使うなどが必要です。また、GraphQLの場合は一度のリクエストで複数のリゾルバーを実行できるため、ログ出力の仕方は工夫が必要になります。(リクエスト単位のログとリゾルバー単位のログをちゃんと出して判別できるようにする。)
ミドルウェア用のファイルを作成
次に以下のコマンドを実行し、ミドルウェア用の各種ファイルを作成します。
$ mkdir -p src/internal/middleware && touch src/internal/middleware/middleware.go
$ mkdir -p src/graph/middleware && touch src/graph/middleware/middleware.go
次に作成したファイルをそれぞれ以下のように記述します。
・「src/internal/middleware/middleware.go」
package middleware

import (
    "context"
    "net/http"

    "github.com/google/uuid"
)

// リクエスト単位用のミドルウェア
func Request(next http.Handler) http.Handler {
    return http.HandlerFunc(func(w http.ResponseWriter, r *http.Request) {
        // リクエスト単位で一意のIDを設定
        uuid := uuid.New().String()

        // コンテキストにrequestIDを追加
        ctx := context.WithValue(r.Context(), "requestID", uuid)

        // 処理実行
        next.ServeHTTP(w, r.WithContext(ctx))
    })
}
※リクエスト時はHTTP用のミドルウェアが先に実行されます。
・「src/graph/middleware/middleware.go」
package middleware

import (
    "context"
    "fmt"

    "go-graphql/internal/logger"

    "github.com/99designs/gqlgen/graphql"
)

// リクエスト単位のログ出力用のAroundResponses
func LoggingAroundResponses(logger logger.Logger) func(ctx context.Context, next graphql.ResponseHandler) *graphql.Response {
    return func(ctx context.Context, next graphql.ResponseHandler) *graphql.Response {
        // リクエストのクエリ関連情報を取得
        opCtx := graphql.GetOperationContext(ctx)

        // リクエストの開始ログ
        msg := fmt.Sprintf("go-graphql request start [Operation=%s, Query=%s, Variables=%s]", opCtx.OperationName, opCtx.RawQuery, opCtx.Variables)
        logger.Info(false, ctx, msg)

        resp := next(ctx)

        // リクエストの完了ログ
        msg = "go-graphql request finished"
        logger.Info(false, ctx, msg)

        return resp
    }
}
※このファイルはGraphQLのミドルウェア用ファイルです。
環境変数用のファイルを作成
次に以下のコマンドを実行し、環境変数用のファイル「.env」を作成します。
$ touch src/.env
次に作成したファイル「src/.env」を以下のように記述します。
・「src/.env」
ENV=local
PORT=8080
ALLOWED_ORIGIN_URL="http://localhost:3000"
USER_BASE_URL="http://localhost:8081"
※ALLOWED_ORIGIN_URLとUSER_BASE_URLの値は例として設定しています。
mainファイル(src/server.go)の修正
次にmainファイル「src/server.go」を以下のように修正します。
・「src/server.go」
package main
import (
"fmt"
"log/slog"
"net/http"
"os"
"go-graphql/graph"
graphMW "go-graphql/graph/middleware"
"go-graphql/internal/logger"
httpMW "go-graphql/internal/middleware"
// クライアント層
clientUser "go-graphql/internal/client/user"
"github.com/99designs/gqlgen/graphql/handler"
"github.com/99designs/gqlgen/graphql/handler/extension"
"github.com/99designs/gqlgen/graphql/handler/lru"
"github.com/99designs/gqlgen/graphql/handler/transport"
"github.com/99designs/gqlgen/graphql/playground"
"github.com/joho/godotenv"
"github.com/rs/cors"
"github.com/vektah/gqlparser/v2/ast"
)
const defaultPort = "8080"
func main() {
/**********************
* .env ファイルの読み込み
***********************/
err := godotenv.Load()
if err != nil {
slog.Error(".envファイルの読み込みに失敗しました。")
}
// ENV
env := os.Getenv("ENV")
// ポート番号
port := os.Getenv("PORT")
if port == "" {
port = defaultPort
}
/***************
* ロガー設定
****************/
logger := logger.NewLogger()
/****************************
* クライアント層のインスタンス化
*****************************/
// httpClientの設定
httpClient := &http.Client{}
// userクライアントの設定
userBaseURL := os.Getenv("USER_BASE_URL")
userClient := clientUser.NewUserHttpClient(httpClient, userBaseURL)
/****************
* GraphQL用の設定
*****************/
// ハンドラー設定
srv := handler.New(graph.NewExecutableSchema(graph.Config{
Resolvers: &graph.Resolver{
// インスタンス設定の追加
Logger: logger,
UserClient: userClient,
},
}))
// ミドルウェア設定
srv.AroundResponses(graphMW.LoggingAroundResponses(logger))
// その他
srv.AddTransport(transport.Options{})
srv.AddTransport(transport.GET{})
srv.AddTransport(transport.POST{})
srv.SetQueryCache(lru.New[*ast.QueryDocument](1000))
srv.Use(extension.Introspection{})
srv.Use(extension.AutomaticPersistedQuery{
Cache: lru.New[string](100),
})
/***************
* CORS設定
****************/
allowedOriginURL := os.Getenv("ALLOWED_ORIGIN_URL")
c := cors.New(cors.Options{
AllowedOrigins: []string{allowedOriginURL},
AllowCredentials: true,
AllowedMethods: []string{"GET", "POST", "OPTIONS"},
AllowedHeaders: []string{"Authorization", "Content-Type"},
})
/*********************
* http用のハンドラー設定
**********************/
// 本番環境以外の場合はPlaygroundを設定
if env != "production" {
http.Handle("/", playground.Handler("GraphQL playground", "/query"))
}
finalHandler := c.Handler(httpMW.Request(srv))
http.Handle("/query", finalHandler)
/*********************
* サーバー起動
**********************/
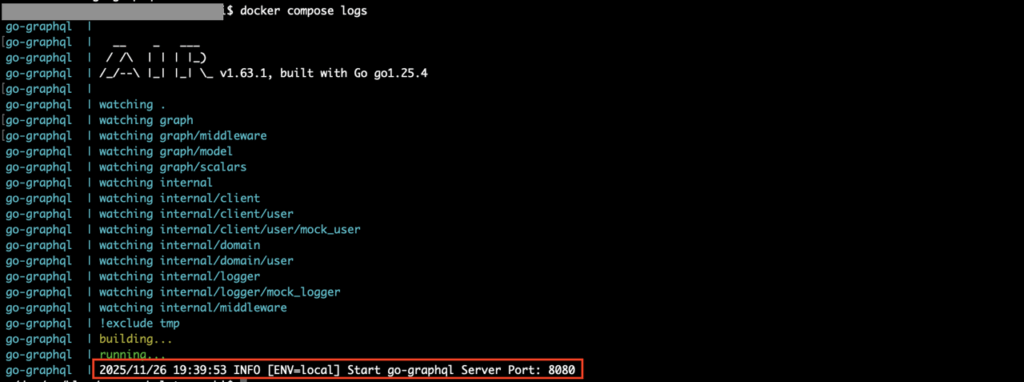
slog.Info(fmt.Sprintf("[ENV=%s] Start go-graphql Server Port: %s", env, port))
if err := http.ListenAndServe(fmt.Sprintf(":%s", port), nil); err != nil {
slog.Error("server stopped", "err", err)
os.Exit(1)
}
}
次に以下のコマンドを実行し、フォーマット修正および静的コード解析を行い、警告が出ないことを確認します。
$ docker compose run --rm graphql go mod tidy
$ docker compose run --rm graphql go fmt ./...
$ docker compose run --rm graphql sh -c "staticcheck ./graph/... 2>&1 | grep -v 'ec.Errorf is deprecated'"
※staticcheckによる静的コード解析では自動生成されるファイル「src/graph/generated.go」も対象になってしまって警告が出るため、それを除外するようなコマンドにしています。
コンテナの再ビルドと起動
次に以下のコマンドを実行し、コンテナを再びルドします。
$ docker compose down
$ docker compose build --no-cache
次に以下のコマンドを実行し、コンテナを起動します。
$ docker compose up -d
次に以下のコマンドを実行し、ログ出力を確認します。
$ docker compose logs
ログ出力を確認し、エラーがなければOKです。
userスキーマのGraphQL APIを試す
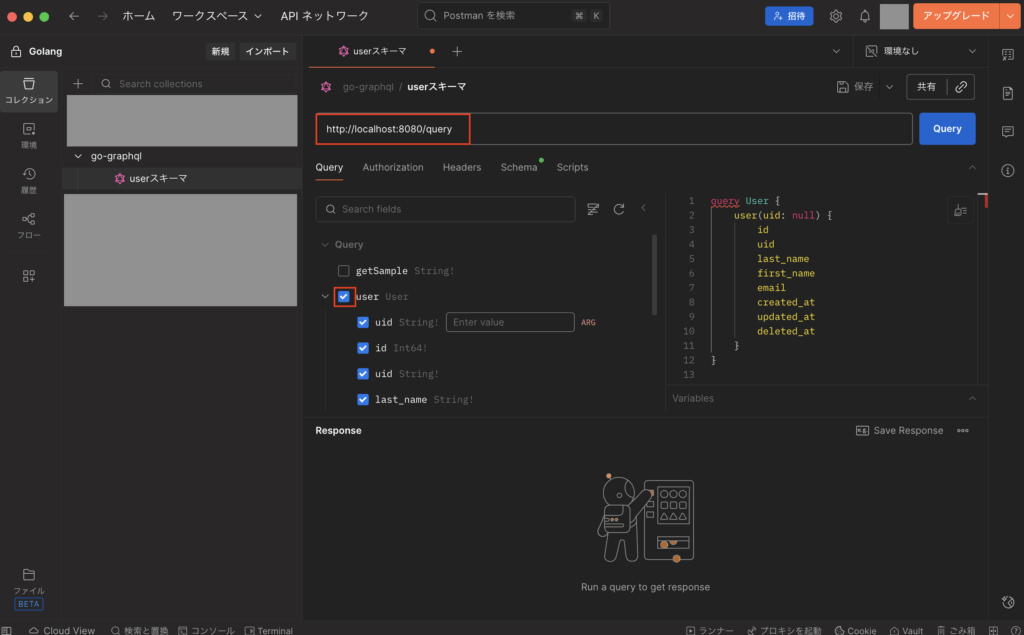
次に上記で作成したuserスキーマのGraphQL APIをPostmanを使って試します。
まずはGraphQL用のリクエストを追加し、URLに「http://localhost:8080/query」を入力し、スキーマからuserにチェックを付けます。
次にuidに「”xxxx-xxxx-xxxx-0001″」を入力後、「Query」ボタンをクリックして実行し、想定通りのデータが取得できればOKです。

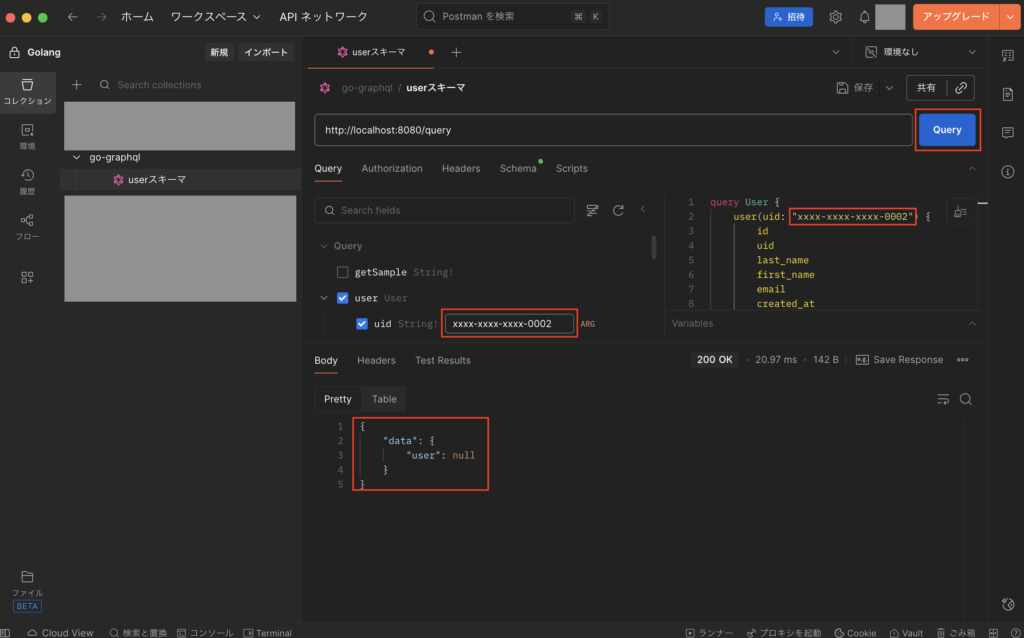
次にuidに「”xxxx-xxxx-xxxx-0002″」を入力後、「Query」ボタンをクリックして実行し、データが取得できずにnullが返ってこればOKです。
次にuidに「”xxxx-xxxx-xxxx-0001-x”」を入力後、「Query」ボタンをクリックして実行し、uidのバリデーションチェックでエラーになってerrorsが返ってこればOKです。
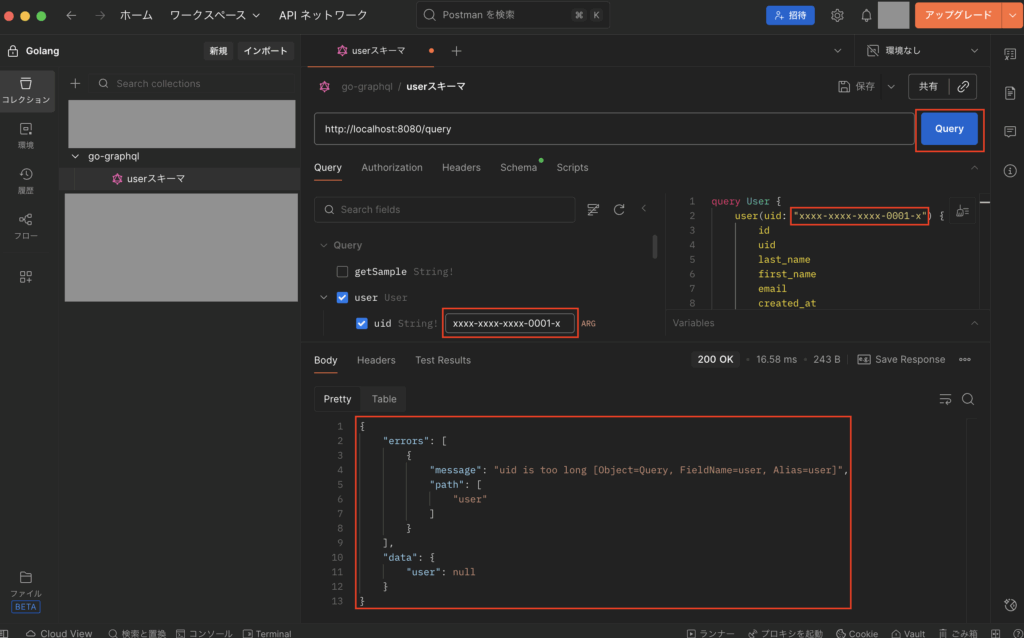
※尚、GraphQLでは予期せぬエラーが発生しない限りはステータスコード200が返り、バリデーションエラーなどのエラーかどうかについてはレスポンス結果から判定する必要があります。(例えばuserがnullじゃないかや、errors項目に値が存在するかなどをチェックして判定する。)
テストコードを追加して試す
次にテストコードを追加して試すため、以下のコマンドを実行し、テストコード用のファイルを追加します。
$ touch src/graph/user.resolvers_test.go
次に作成したファイル「src/graph/user.resolvers_test.go」を以下のように記述します。
・「src/graph/user.resolvers_test.go」
package graph_test

import (
    "testing"
    "time"

    "go-graphql/graph"
    mockUserClient "go-graphql/internal/client/user/mock_user"
    domainUser "go-graphql/internal/domain/user"
    mockLogger "go-graphql/internal/logger/mock_logger"
    httpMW "go-graphql/internal/middleware"

    "github.com/99designs/gqlgen/client"
    "github.com/99designs/gqlgen/graphql/handler"
    "github.com/stretchr/testify/assert"
    "github.com/vektah/gqlparser/v2/gqlerror"
    "go.uber.org/mock/gomock"
)

func TestResolversUser(t *testing.T) {
    /*********
    * モック化
    **********/
    ctrl := gomock.NewController(t)
    defer ctrl.Finish()

    // ロガーのモック化
    mockLogger := mockLogger.NewMockLogger(ctrl)

    // クライアント層のモック化
    mockUserClient := mockUserClient.NewMockUserClient(ctrl)

    /**************************
    * gqlgenのテスト用クライアント
    ***************************/
    srv := handler.NewDefaultServer(graph.NewExecutableSchema(graph.Config{
        Resolvers: &graph.Resolver{
            Logger: mockLogger,
            UserClient: mockUserClient,
        },
    }))
    handler := httpMW.Request(srv)
    c := client.New(handler)

    t.Run("正常終了すること", func(t *testing.T) {
        // ロガーのモック設定
        mockLogger.EXPECT().Info(gomock.Any(), gomock.Any(), gomock.Any()).Return()

        // ユーザークライアントのモック設定
        expectedUser := &domainUser.User{
            ID: int64(1),
            UID: "xxxx-xxxx-xxxx-0001",
            LastName: "田中",
            FirstName: "太郎",
            Email: "t.tanaka@example.com",
            CreatedAt: time.Now(),
            UpdatedAt: time.Now(),
            DeletedAt: nil,
        }
        mockUserClient.EXPECT().FindByUID(gomock.Any(), gomock.Any()).Return(expectedUser, nil)

        // レスポンス結果用の変数定義
        var res struct {
            User struct {
                ID int64 `json:"id"`
                UID string `json:"uid"`
                LastName string `json:"last_name"`
                FirstName string `json:"first_name"`
                Email string `json:"email"`
                CreatedAt string `json:"created_at"`
                UpdatedAt string `json:"updated_at"`
                DeletedAt *string `json:"deleted_at"`
            } `json:"user"`
        }

        // クエリの設定
        query := `
            query {
                user(uid: "xxxx-xxxx-xxxx-0001") {
                    id
                    uid
                    last_name
                    first_name
                    email
                    created_at
                    updated_at
                    deleted_at
                }
            }
        `

        // テストの実行
        err := c.Post(query, &res)

        // 検証
        assert.NoError(t, err)
        assert.Equal(t, int64(1), res.User.ID)
        assert.Equal(t, "xxxx-xxxx-xxxx-0001", res.User.UID)
        assert.Equal(t, "田中", res.User.LastName)
        assert.Equal(t, "太郎", res.User.FirstName)
        assert.Equal(t, "t.tanaka@example.com", res.User.Email)
        assert.NotNil(t, res.User.CreatedAt)
        assert.NotNil(t, res.User.UpdatedAt)
        assert.Nil(t, res.User.DeletedAt)
    })

    t.Run("uidのバリデーションエラー", func(t *testing.T) {
        // ロガーのモック設定
        mockLogger.EXPECT().Info(gomock.Any(), gomock.Any(), gomock.Any()).Return()
        mockLogger.EXPECT().Warn(gomock.Any(), gomock.Any(), gomock.Any()).Return()

        // レスポンス結果用の変数定義
        var res struct {
            User *struct {
                ID int64 `json:"id"`
                UID string `json:"uid"`
                LastName string `json:"last_name"`
                FirstName string `json:"first_name"`
                Email string `json:"email"`
                CreatedAt string `json:"created_at"`
                UpdatedAt string `json:"updated_at"`
                DeletedAt *string `json:"deleted_at"`
            } `json:"user"`
        }

        // クエリの設定
        query := `
            query {
                user(uid: "xxxx-xxxx-xxxx-0001-x") {
                    id
                    uid
                    last_name
                    first_name
                    email
                    created_at
                    updated_at
                    deleted_at
                }
            }
        `

        // テストの実行
        err := c.Post(query, &res)

        // 検証
        assert.Error(t, err)
        assert.Nil(t, res.User)
        assert.Contains(t, err.Error(), "uid is too long")

        if errList, ok := err.(gqlerror.List); ok {
            assert.Equal(t, 1, len(errList))
            assert.Equal(t, "uid is too long [Object=Query, FieldName=user, Alias=user]", errList[0].Message)
            assert.Equal(t, "user", errList[0].Path)
        }
    })
}
※テスト実行にはgqlgenのclientを使う。
次に以下のコマンドを実行し、go.modを更新します。
$ docker compose exec graphql go mod tidy
次に以下のコマンドを実行し、テストを実行します。
$ docker compose exec graphql go test -v $(docker compose exec graphql go list -f '{{if or .TestGoFiles .XTestGoFiles}}{{.ImportPath}}{{end}}' ./...)※対象のファイルだけ実行させるようなコマンドにしています。
テスト実行後、以下のように全てのテストがPASSすればOKです。

本番環境用のDockerコンテナを作る
次に本番環境にデプロイすることを想定し、一つのDockerコンテナ単体で起動できるようにします。
まずは以下のコマンドを実行し、各種ファイルを作成します。
$ mkdir -p deploy/docker/prod && touch deploy/docker/prod/Dockerfile
$ touch src/.env.production
次に作成したファイルをそれぞれ以下のように記述します。
・「src/.env.production」
ENV=production
PORT=8080
ALLOWED_ORIGIN_URL="http://localhost:3000"
USER_BASE_URL="http://localhost:8081"
※本番環境用としてこの環境変数ファイル「.env.production」を使いますが、このファイルには機密情報を含めないようにご注意下さい。
・「deploy/docker/prod/Dockerfile」
####################
# ビルドステージ
####################
FROM golang:1.25.4-alpine3.21 AS builder

WORKDIR /go/src

COPY ./src .

# 依存関係をインストール
RUN go install

# ビルド(GOOS:OS指定、GOARCH:CPUアーキテクチャ指定)
RUN GOOS=linux GOARCH=amd64 go build -o main .

####################
# 実行ステージ
####################
FROM alpine:3.21 AS runner

# タイムゾーンを設定
ENV TZ=Asia/Tokyo

# インストール可能なパッケージ一覧の更新
RUN apk update && \
    apk upgrade && \
    # パッケージのインストール(--no-cacheでキャッシュ削除)
    apk add --no-cache \
            tzdata

WORKDIR /app

# コンテナ用ユーザー作成
RUN addgroup --system --gid 1001 appuser && \
    adduser --system --uid 1001 appuser

# ビルドステージで作成したバイナリをコピー
COPY --from=builder --chown=appuser:appuser ./go/src/main .
COPY --from=builder --chown=appuser:appuser ./go/src/.env.production ./.env

# ポートを設定
EXPOSE 8080

# コンテナ起動ユーザー設定
USER appuser

# APIサーバー起動コマンド
CMD ["./main"]
※例えばGoogle CloudのCloud Runなどにデプロイする際は、Goのビルド時にOSやCPUアーキテクチャの指定が必要になります。
次に以下のコマンドを実行し、Dockerコンテナのビルドおよび起動します。
$ docker compose down
$ docker build --no-cache -f ./deploy/docker/prod/Dockerfile -t go-graphql:v1.0.0 .
$ docker run -d -p 80:8080 go-graphql:v1.0.0
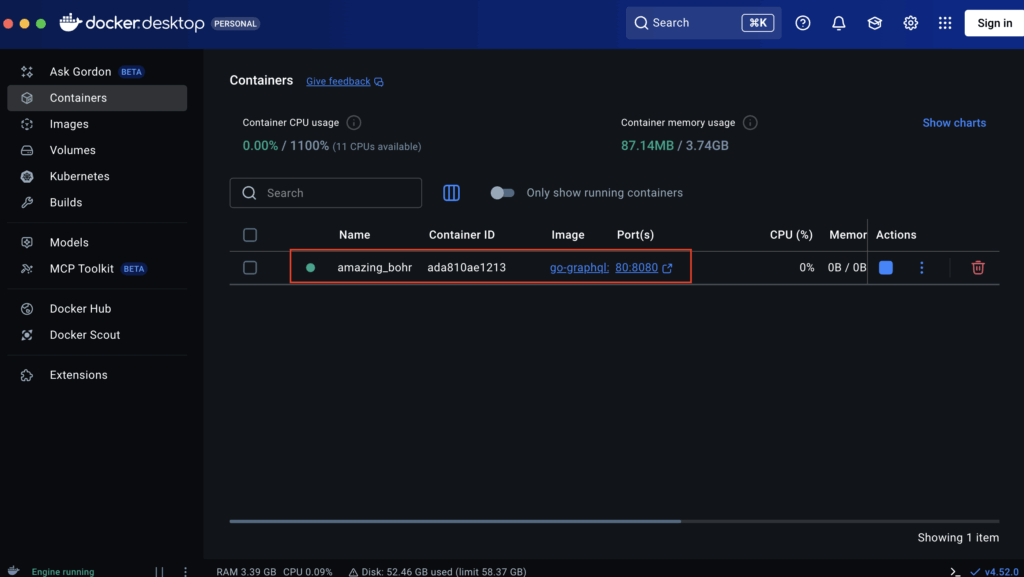
次にDocker Desktopを確認し、Dockerコンテナが起動していればOKです。
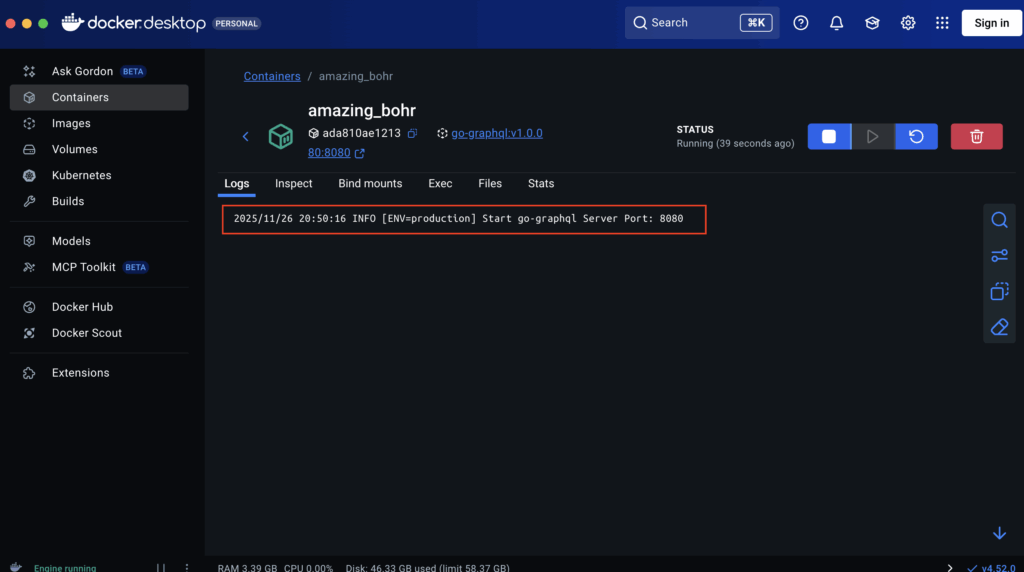
次にDockerコンテナのログも確認し、想定通り出力されていればOKです。
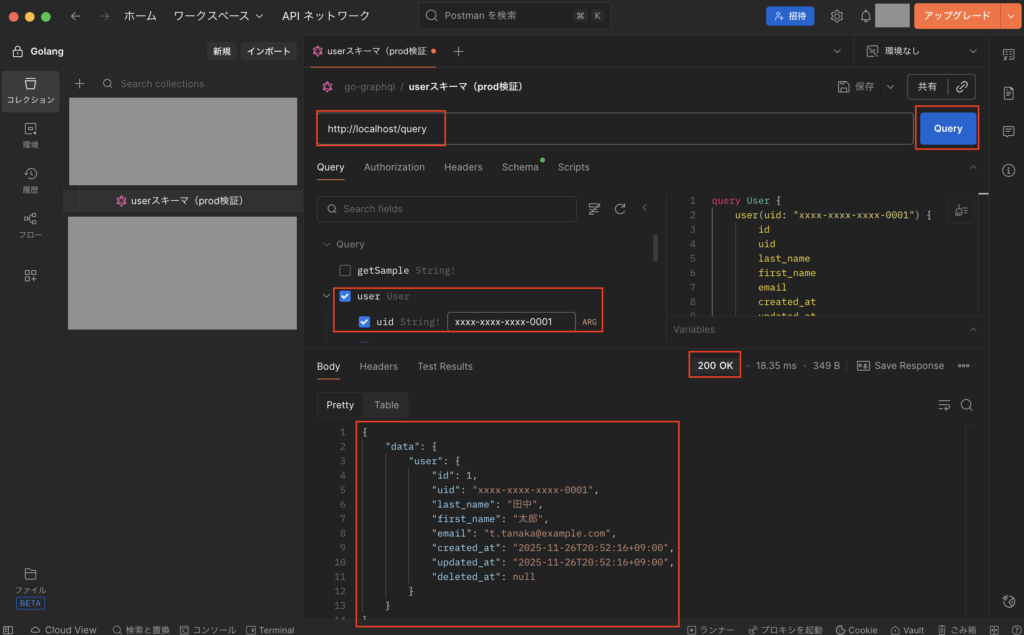
次にPostmanを使ってテストをしてみますが、URLに「http://localhost/query」を入力し、スキーマからuserにチェックを付け、uidに「”xxxx-xxxx-xxxx-0001″」を入力後、「Query」ボタンをクリックして実行し、想定通りのデータが取得できればOKです。
GraphQLのAPI仕様書について
GraphQLについては、REST APIのOpenAPIやgRPCのドキュメントなどのような別のAPI仕様書は存在せず、スキーマファイル(例:src/graph/user.graphqls)がAPIの仕様書になってます。
そのため、GraphQLでAPI仕様書を確認したい場合は、各種スキーマファイルを直接確認して下さい。
最後に
今回はGo言語(Golang)でGraphQLのBFFを開発する方法について解説しました。
Goの場合はライブラリ「gqlgen」を使うことで比較的簡単にGraphQLサーバーを作れたので、その点は非常に良かったです。
BFFを導入する際に、パフォーマンスを考慮してGo言語のGraphQLを使いたい方は、ぜひ参考にしてみて下さい。

コメント